In this workshop, we'll explore how to implement real-time use cases with federated GraphQL subscriptions in GraphOS. You'll gain hands-on experience running subscription operations in a federated graph and learn different techniques for scaling and optimizing performance.
What you'll learn
- How to enrich real-time data experiences with federated subscription operations
- Architecture recommendations for scaling and improving performance
- How to observe subscription operations and their performance impacts
Who this workshop is for
- Backend developers with hands-on experience of GraphQL. Knowledge of federation is recommended but not required.
Workshop resources
⚠️ Before the workshop...
If you have any questions or run into any issues with the workshop prep below, scroll to the end of this page to leave a comment or send us an email at summit@apollographql.com. We're here to help!
You will need to complete the following:
Please make sure to complete the above steps before continuing on.
You'll also need to do the following:
- Clone the course repository
- Download the router binary
- Create a graph in GraphOS Studio
- Publish the subgraph schemas for the
messagesandaccountssubgraphs
Let's walk through those steps now.
Clone the repo locally
Clone the repo.
https://github.com/apollographql-education/federated-subscriptions-workshop-2024.gitOpen it up in your code editor (we recommend VS Code).
📦 federated-subscriptions-workshop-2024┣ 📂 accounts┣ 📂 messages┣ 📂 router┣ 📄 .gitignore┗ 📄 README.md
This repository contains two GraphQL servers—messages and accounts—which will become the first subgraphs in our federated graph. We'll spend most of our time in the messages directory, however we'll still need accounts up and running as well.
Set up accounts
Navigate to the
accountsdirectory.Install the dependencies.
accountsnpm installYou should see some output in the terminal:
> npx prisma migrate devPrisma schema loaded from datasources/prisma/schema.prismaDatasource "db": SQLite database "dev.db" at "file:./dev.db"Already in sync, no schema change or pending migration was found.✔ Generated Prisma Client (v5.19.1) to ./node_modules/@prisma/client in 90msBy default, our database is pre-seeded and ready to go. If anything goes wrong along the way, look for the
datasources/prisma/dev.dbfile and delete it. Then, in the terminal, runnpx prisma migrate devto reset the database.Run the
accountssubgraph.accountsnpm run startYou'll see some output that our
accountsserver is running on port 4002.accounts🚀 Subgraph accounts running at http://localhost:4002/
Set up messages
We'll follow the same process for messages.
Navigate to the
messagesdirectory.Install the dependencies.
messagesnpm installAs part of the postinstall process, our Prisma database gets seeded with starter data. You'll see some output in the terminal to that effect:
Running seed command `ts-node src/datasources/prisma/seed.ts` ...{captain: { username: 'dallas', name: 'Captain Dallas', role: 'guest' },xenomorph: { username: 'xeno', name: 'Xeno', role: 'host' },ripley: { username: 'ripley', name: 'Ellen Ripley', role: 'guest' },kane: { username: 'kane', name: 'Gilbert Kane', role: 'guest' },confrontation: { id: 'xeno-ripley-chat', openedTime: 2024-09-27T21:09:20.387Z }}🌱 The seed command has been executed.In the
messages/src/datasources/prismadirectory, there should now adev.dbfile.Run the
messagessubgraph.npm run devYou'll see some output that the
messagesserver is running on port 4001.messages🚀 Subgraph airlock-messages-subgraph ready at http://localhost:4001/
Set up the router
Create a new file called
.envin therouterdirectory. We'll use this file to store values we need to run the router.📂 router┣ 📄 .env┗ 📄 router-config.yamlOpen up a new terminal and navigate to the
routerdirectory.Install the router binary.
routercurl -sSL https://router.apollo.dev/download/nix/latest | shNote: For alternate methods of downloading the router, please check out the official Apollo documentation.
You'll now have the
routerbinary file in the directory.📂 router┣ 📄 .env┣ 📄 router┗ 📄 router-config.yaml
Set up your graph
If you haven't already, please join the GraphOS Studio organization to complete this step.
- Don't have an Apollo account yet? You'll be prompted to create one when clicking the link.
- Are you an existing Apollo customer? You will need to join with an email address not associated with your company's SSO login.
Go to our workshop's Studio organization.
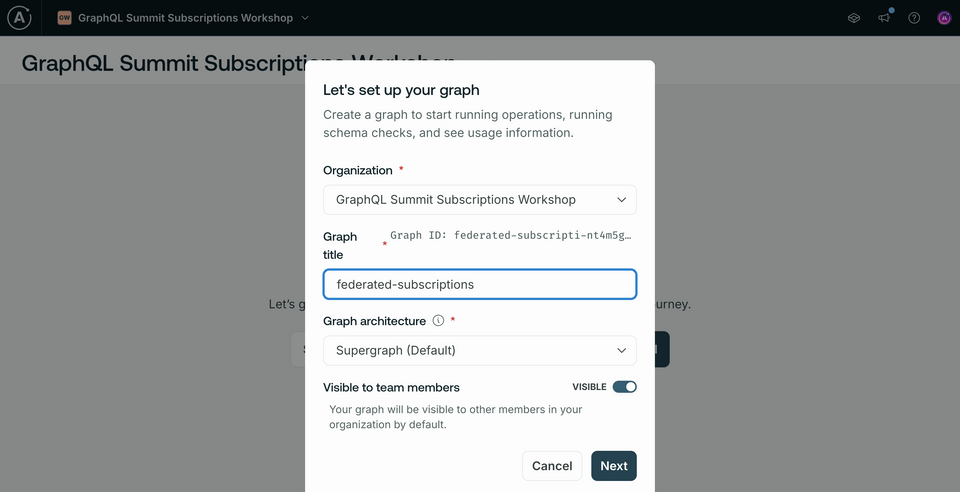
Click + Create new graph.
For the graph title, we recommend typing in your full name (or GitHub username) so you can easily find it later. This organization is shared between all workshop participants so you'll want a graph title that's easily searchable and identifiable for yourself.
Keep the architecture as Supergraph, then click Next.
https://studio.apollographql.com
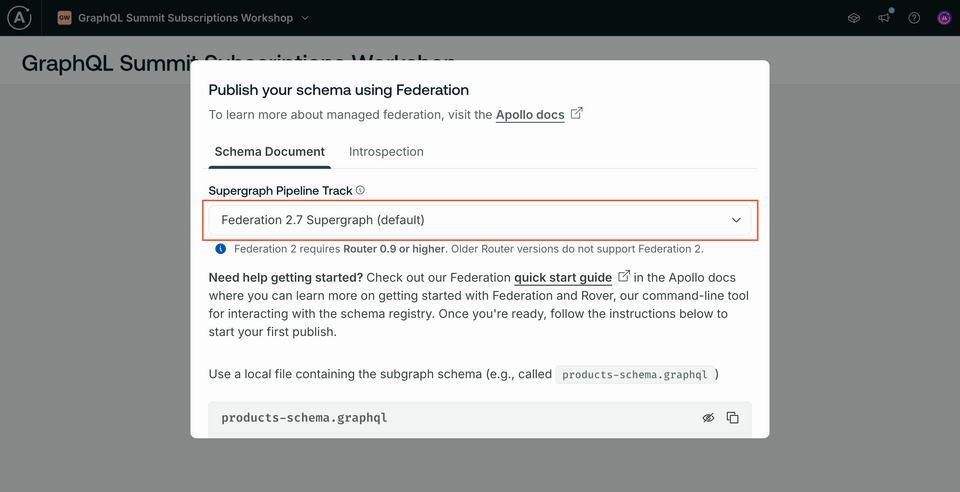
Next, we'll see a modal for publishing our schema. Keep the federation version as 2.7!
https://studio.apollographql.com
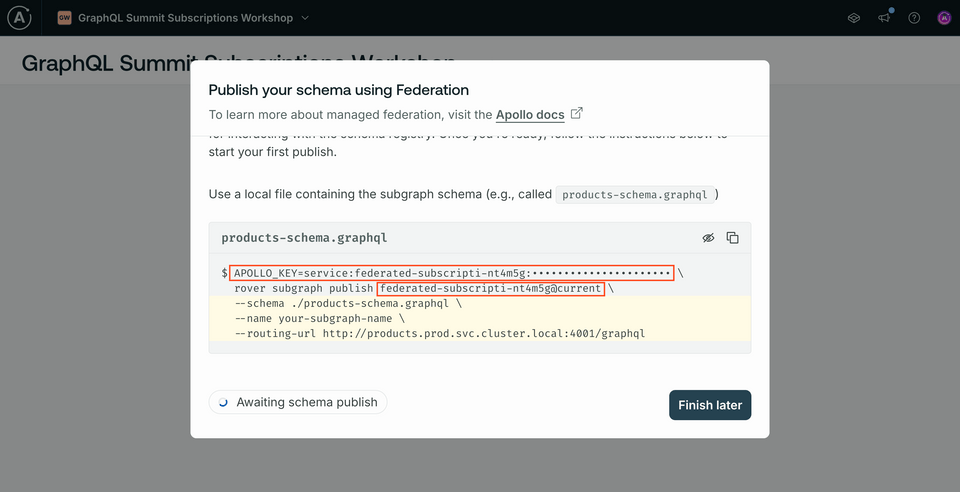
Scrolling down, in the codeblock at the bottom of the modal, take note of two pieces of data: the
APOLLO_KEY(you can toggle the whole value on and off using the eye icon at the top of the codeblock) and the value that followsrover subgraph publish. This is yourAPOLLO_GRAPH_REF.https://studio.apollographql.com
Store both of those values in the
router/.env. It should look something like this.router/.envAPOLLO_KEY=service:your-graph-details:random-stringAPOLLO_GRAPH_REF=federated-subscriptions@current
Publish subgraph schemas
Navigate to the
messagesdirectory in the terminal.Run the
rover subgraph publishcommand below, substituting in your own values forAPOLLO_GRAPH_REF.Publishing the messages subgraphrover subgraph publish <APOLLO_GRAPH_REF> --name messages --schema ./src/schema.graphql --routing-url http://localhost:4001You'll see the following message:
The host localhost is not routable via the public internet. Continuing the publish will make this subgraph reachable in local environments only. Would you still like to publish? [y/N]. Typeythen hit Enter.
Navigate to the
accountsdirectory in the terminal.Run the
rover subgraph publishcommand below, substituting in your own values forAPOLLO_GRAPH_REF.Publishing the accounts subgraphrover subgraph publish <APOLLO_GRAPH_REF> --name accounts --schema ./accounts.graphql --routing-url http://localhost:4002
Running the router
Before continuing on, make sure both messages and accounts subgraphs are still running.
Navigate to the
routerdirectory in the terminal.Run the command below, substituting in your own values for
APOLLO_GRAPH_REFandAPOLLO_KEY.routerAPOLLO_KEY=your-apollo-key \APOLLO_GRAPH_REF=your-apollo-graph-ref \./router \--config ./router-config.yaml
You'll see some output in the terminal - then a confirmation that the router is running on http://127.0.0.1:4000!
Quickstart on Workshop Day
To get everything running on the day of the workshop, here's a quickstart.
First, start up messages.
npm run dev
Next, accounts.
npm run start
Finally, boot up the router, substituting in your own values for APOLLO_GRAPH_REF and APOLLO_KEY.
APOLLO_KEY=your-apollo-key \APOLLO_GRAPH_REF=your-apollo-graph-ref \./router \--config ./router-config.yaml
And that's all you need! We'll see you at Summit!
Share your questions and comments about this lesson
Your feedback helps us improve! If you're stuck or confused, let us know and we'll help you out. All comments are public and must follow the Apollo Code of Conduct. Note that comments that have been resolved or addressed may be removed.
You'll need a GitHub account to post below. Don't have one? Post in our Odyssey forum instead.