Overview
We've got a great overview of rocket launches, but we're missing the specifics: details about any particular launch.
In this lesson, we will:
- Write a second GraphQL query to request details about a single launch
- Use that data in our
LaunchDetailscomponent - Sketch out a basic auth flow
Avoiding overfetching
To get more information to show on the detail page, we have a couple of options:
Our first option is to request all the details we want to display for every single launch in the LaunchList query, and then pass that retrieved object on to the LaunchDetails composable.
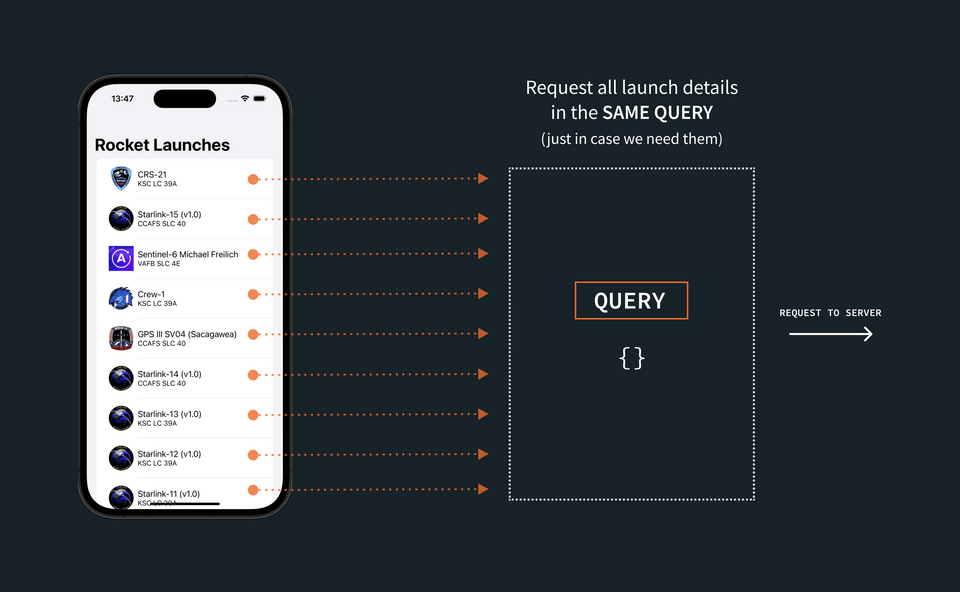
On the other hand, we could request the additional details for a single launch, when we need it, by passing that launch's identifier to a new query.
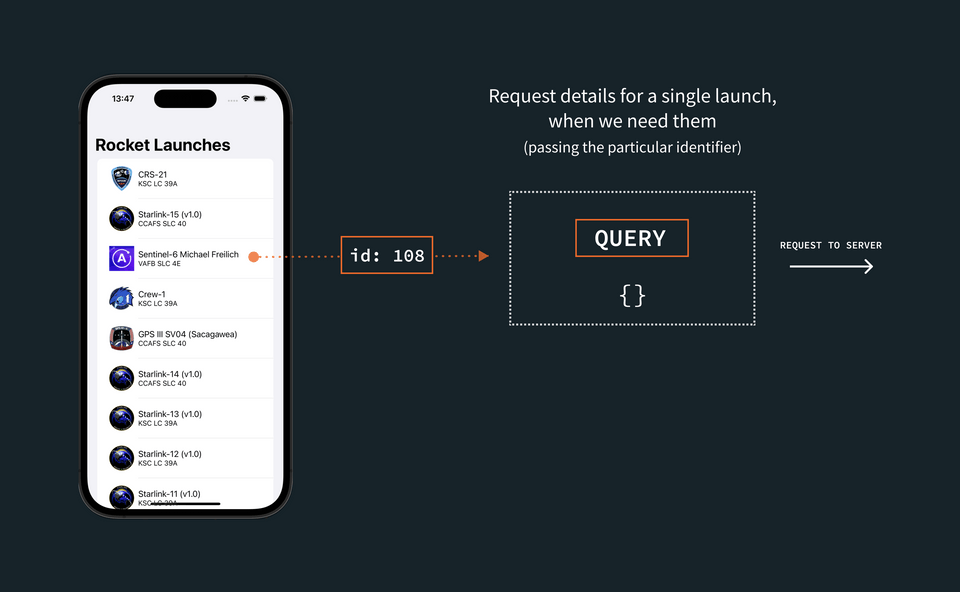
The first option (requesting all the details, for all the launches, all at once) can seem easier if there isn't a substantial difference in size between the data we're requesting for the list, and the data we're requesting for each details page.
But it's important to remember that the ability to query for exactly the data we need is one of the greatest benefits of using GraphQL. If we don't actually need to display additional information, we can save bandwidth, execution time, and battery life by not asking for the data until we need it.
This is especially true when we have a much larger query for our detail view than for our list view. Passing the identifier and then fetching based on that is considered a best practice. Even though the amount of data in this case doesn't differ greatly, we'll opt for the second option—and construct a query that fetches details based on a provided launch ID.
Create the details query
Create a new GraphQL file in your graphql directory named LaunchDetails.graphql.
In this file, we'll add the details we want to display in the LaunchDetail component. First, we'll return to Sandbox and make sure the query works! Or if you prefer, use the embedded instance below:
In the Explorer tab, start by clicking the plus button in the middle Operation panel:
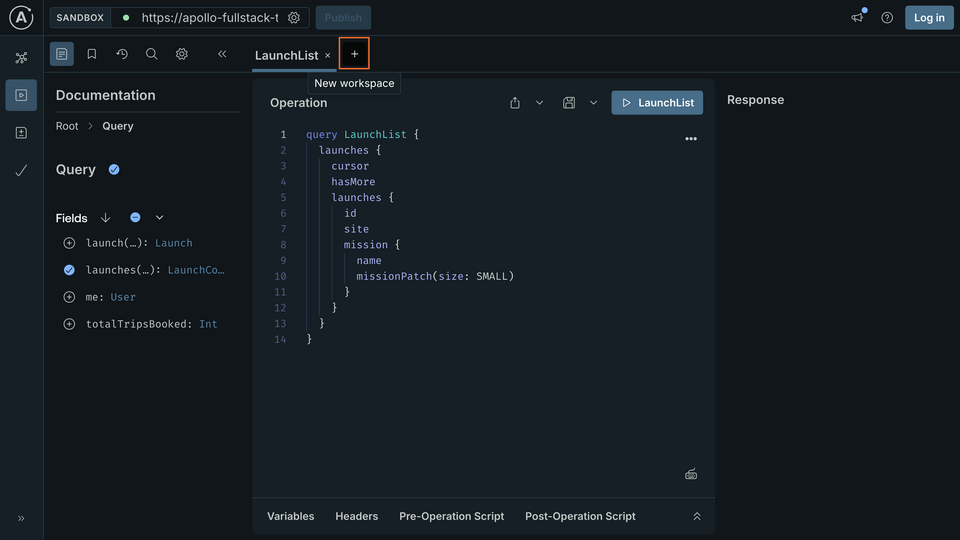
A new tab will be added with nothing in it:
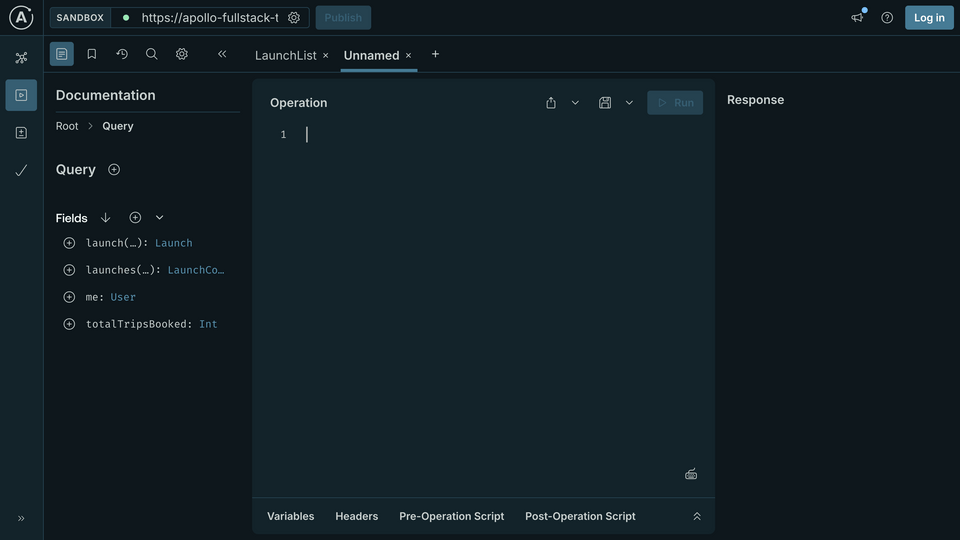
In the left-hand Documentation panel, make sure that you can see the Query type with a list of available fields to choose from. (You might need to navigate back up to the root level.)
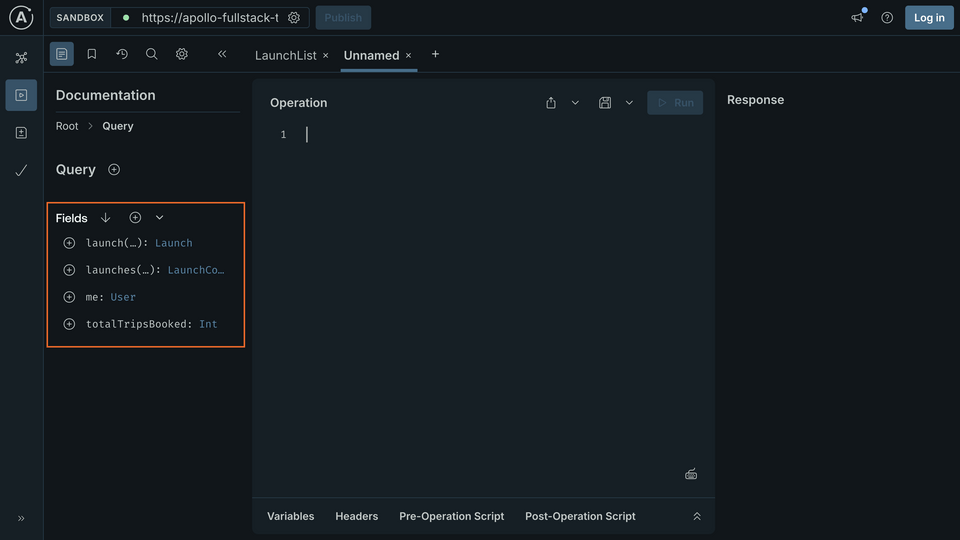
Select the launch field by clicking the plus button next to it. Apollo Sandbox will automatically set up the query for you to use:
query Launch($launchId: ID!) {launch(id: $launchId) {}}
First, change the name of the operation from "Launch" to "LaunchDetails"—that will then reflect in the tab name and make it easier to tell which query we're working with:
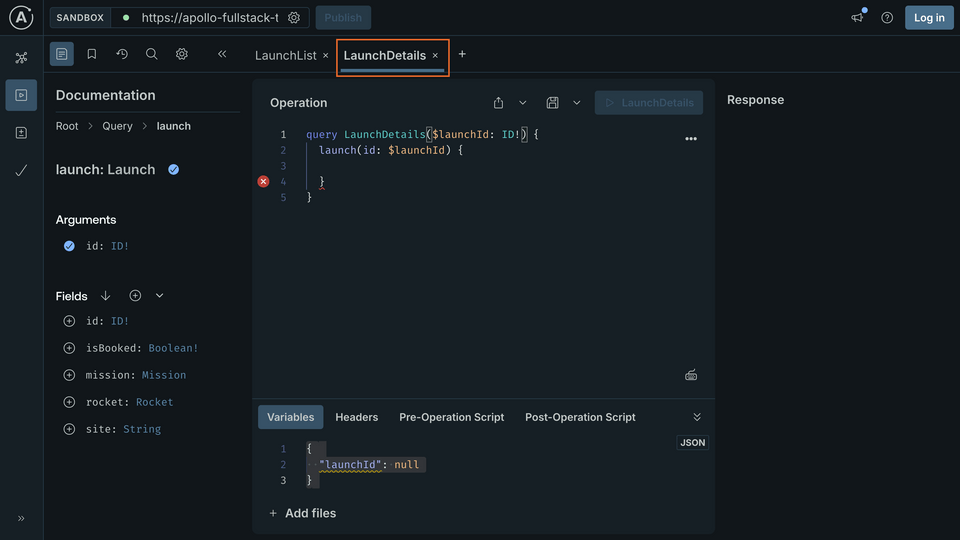
Let's go through what's been added here:
- Again, we've added an operation, but this time it accepts a variable
$launchId. This was added automatically by Apollo Sandbox because$launchIdis non-null and does not have a default value. - Looking more closely at
$launchId, you'll notice that it is declared as anIDscalar type. The!annotation indicates that it is non-null. - Within the query, we include the
launchfield in the selection set.launchaccepts an argumentid, which is set to the value of the variable$launchId. - Again, there's blank space for you to add the fields you want to get details for on the returned object, which in this case is a
Launch. - Finally, at the bottom, the Variables section of the Operation panel has been expanded, and a dictionary has been added with a key of
"launchId". When the query is executed, the server will pass this as the value of$launchId.
Note: GraphQL's assumptions about nullability are different from Kotlin's. In Kotlin, types are non-nullable by default. A type becomes nullable if it is followed by ?.
In GraphQL, types are nullable by default. A type becomes non-nullable if it is followed by !.
Keep this difference in mind when you switch between editing Kotlin and GraphQL files.
Now in the Apollo Sandbox, start by using the checkboxes or typing to add the same properties we're already requesting in the LaunchList query. One difference: Use LARGE for the mission patch size since the patch will be displayed in a much larger ImageView:
query LaunchDetails($launchId: ID!) {launch(id: $launchId) {idsitemission {namemissionPatch(size: LARGE)}}}
Next, look in the left sidebar to see what other fields are available. Selecting rocket will add a set of brackets to request details about the launch's rocket, and drill you into the rocket property, showing you the available fields on the Rocket type:
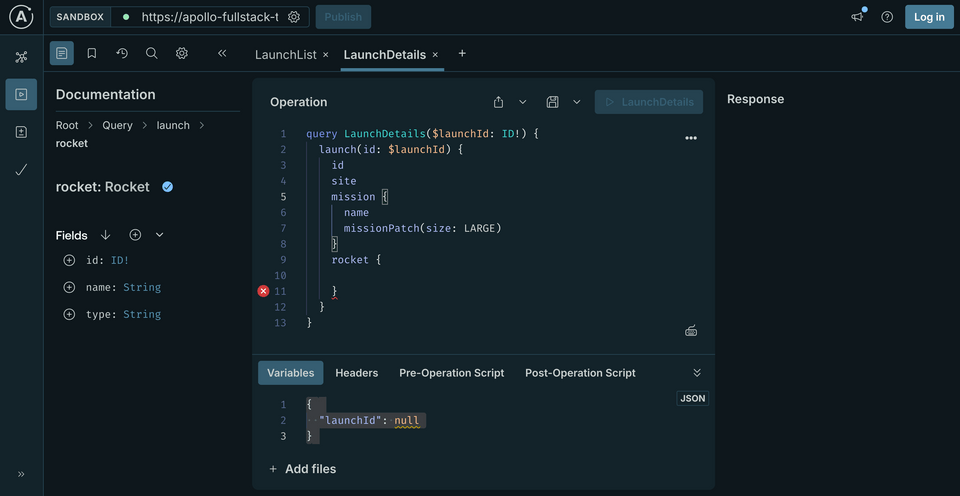
Click the buttons to check off name and type. Next, go back to the Launch type by clicking launch from the Documentation panel breadcrumbs.
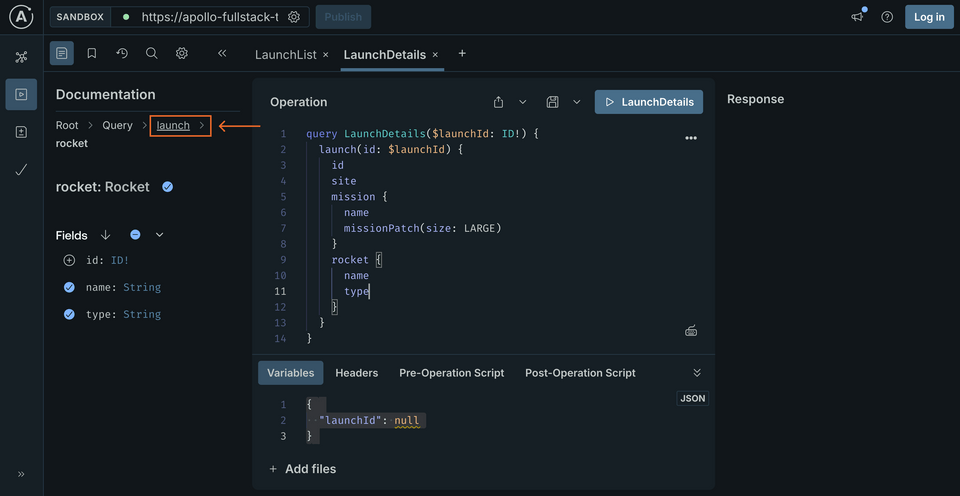
Finally, check off the isBooked property on the Launch. Your final query should look like this:
query LaunchDetails($id: ID!) {launch(id: $id) {idsitemission {namemissionPatch(size: LARGE)}rocket {nametype}isBooked}}
At the bottom of the Operation panel, update the Variables section to pass in an ID for a launch. In this case, it needs to be a string that contains a number:
{"launchId": "25"}
This tells Apollo Sandbox to fill in the value of the $launchId variable with the value "25" when it runs the query. Press the big play button, and you should get some results back for the launch with ID 25:
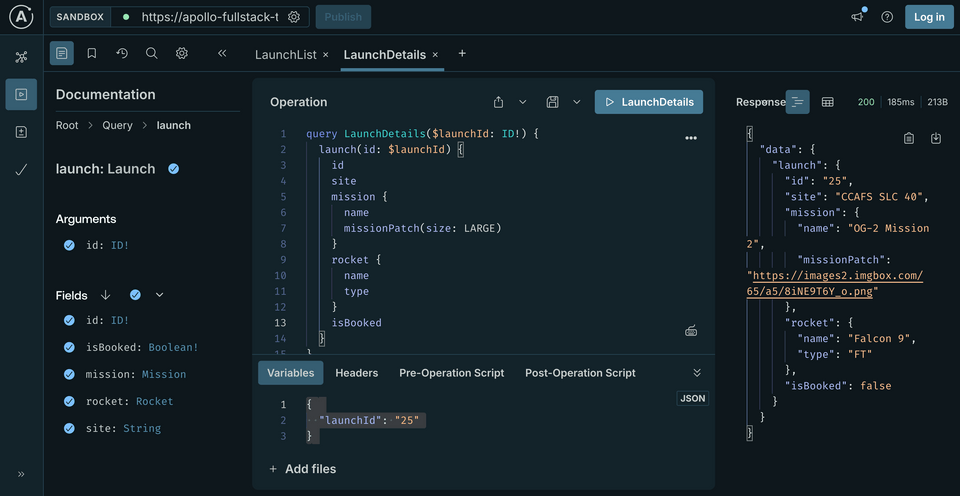
Now that we've confirmed it works, we'll copy the query (either by selecting all the text or using the Copy Operation option from the meatball menu as before) and paste it into our LaunchDetails.graphql file. Thanks to the Apollo GraphQL Plugin, Android Studio runs code generation for us, so we should have typesafe Kotlin code generated instantaneously after saving this query.
Execute the query
Now let's update our app code so it can use the data we're fetching in the LaunchDetails query.
In LaunchDetails.kt, declare response and a LaunchedEffect to execute the query:
@Composablefun LaunchDetails(launchId: String) {var response by remember { mutableStateOf<ApolloResponse<LaunchDetailsQuery.Data>?>(null) }LaunchedEffect(Unit) {response = apolloClient.query(LaunchDetailsQuery(launchId)).execute()}Column (// ...
In the same method, we'll integrate the response data into the UI. We'll use Coil's AsyncImage to display the mission patch:
// ...LaunchedEffect(Unit) {response = apolloClient.query(LaunchDetailsQuery(launchId)).execute()}Column(modifier = Modifier.fillMaxSize().padding(16.dp)) {Row(verticalAlignment = Alignment.CenterVertically) {// Mission patchAsyncImage(modifier = Modifier.size(160.dp, 160.dp),model = response?.data?.launch?.mission?.missionPatch,placeholder = painterResource(R.drawable.ic_placeholder),error = painterResource(R.drawable.ic_placeholder),contentDescription = "Mission patch")Spacer(modifier = Modifier.size(16.dp))Column {// Mission nameText(style = MaterialTheme.typography.headlineMedium,text = response?.data?.launch?.mission?.name ?: "")// Rocket nameText(modifier = Modifier.padding(top = 8.dp),style = MaterialTheme.typography.headlineSmall,text = response?.data?.launch?.rocket?.name?.let { "🚀 $it" } ?: "",)// SiteText(modifier = Modifier.padding(top = 8.dp),style = MaterialTheme.typography.titleMedium,text = response?.data?.launch?.site ?: "",)}}}
Show a loading state
Since response is initialized to null, you can use this as an indication that the result has not been received yet.
To structure the code a bit, extract the details UI into a separate function that takes the response as a parameter. Beginning with Column through the end of the public LaunchDetails function, move those lines into a new private function, also named LaunchDetails.
@Composablefun LaunchDetails(launchId: String) {// (see next snippet)}@Composableprivate fun LaunchDetails(response: ApolloResponse<LaunchDetailsQuery.Data>) {Column(modifier = Modifier.fillMaxSize().padding(16.dp)) {// etc.
Now in the original, public LaunchDetails function, check if response is null and show a loading indicator if it is, otherwise call the new function with the response:
@Composablefun LaunchDetails(launchId: String) {var response by remember { mutableStateOf<ApolloResponse<LaunchDetailsQuery.Data>?>(null) }LaunchedEffect(Unit) {response = apolloClient.query(LaunchDetailsQuery(launchId)).execute()}if (response == null) {Loading()} else {LaunchDetails(response!!)}}
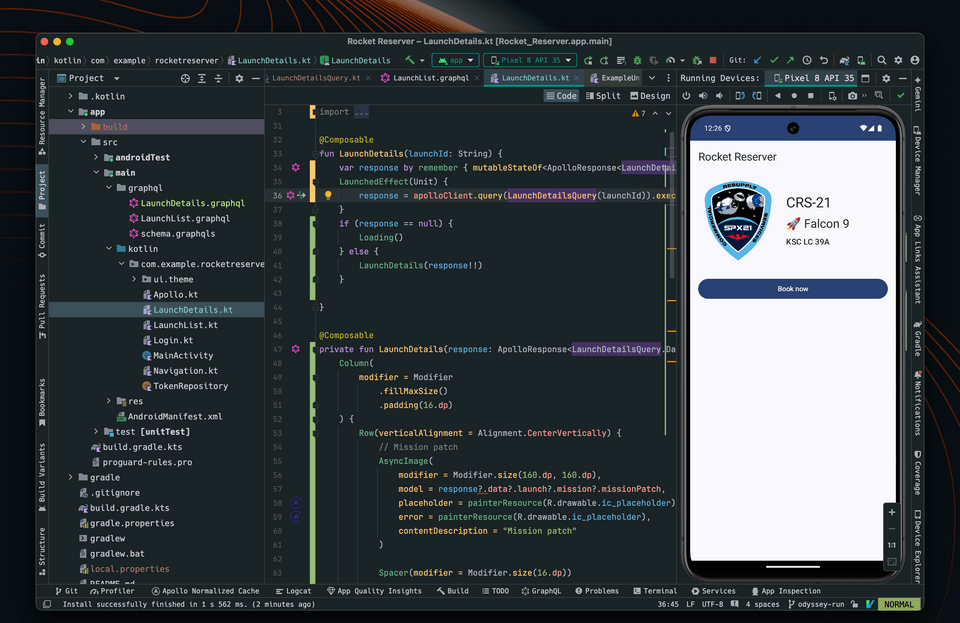
After tapping on a launch in the main view, you should see something like this in the launch details view:
Handle the Book now button
To book a trip, the user must be logged in. If the user is not logged in, clicking the Book now button should open the login screen.
First let's pass a lambda to LaunchDetails to take care of navigation:
@Composablefun LaunchDetails(launchId: String, navigateToLogin: () -> Unit) {
And update the call site later in that composable:
Loading -> Loading()is Error -> ErrorMessage(s.message)is Success -> LaunchDetails(s.data, navigateToLogin)
The lambda should be declared in MainActivity, where the navigation is handled:
composable(route = "${NavigationDestinations.LAUNCH_DETAILS}/{${NavigationArguments.LAUNCH_ID}}") { navBackStackEntry ->LaunchDetails(launchId = navBackStackEntry.arguments!!.getString(NavigationArguments.LAUNCH_ID)!!,navigateToLogin = {navController.navigate(NavigationDestinations.LOGIN)})}
Next, go back to LaunchDetails.kt. You can comment out the preview code to get rid of the compiler errors.
First, let's make sure our private fun LaunchDetails accepts another parameter for our navigateToLogin lambda:
private fun LaunchDetails(data: LaunchDetailsQuery.Data,navigateToLogin: () -> Unit,) {
Within that same function, replace the TODO with a call to a function where we handle the button click:
onClick = {onBookButtonClick(launchId = data.launch?.id ?: "",isBooked = data.launch?.isBooked == true,navigateToLogin = navigateToLogin)}
And finally, implement onBookButtonClick in a new private function:
private fun onBookButtonClick(launchId: String, isBooked: Boolean, navigateToLogin: () -> Unit): Boolean {if (TokenRepository.getToken() == null) {navigateToLogin()return false}if (isBooked) {// TODO Cancel booking} else {// TODO Book}return false}
TokenRepository is a helper class that handles saving/retrieving a user token in EncryptedSharedPreference. We will use it to store the user token when logging in.
Returning a boolean will be useful later to update the UI depending on whether the execution happened or not.
Of course, a production application's authentication flow would almost certainly be more sophisticated than this, but the focus of this course is on GraphQL, so we'll stay focused on that 😄
Up next
So far we've built our application to handle the "happy path." Errors are inevitable, though, within any software system — GraphQL is no exception! Let's learn more about how to handle errors that come from our server.
Share your questions and comments about this lesson
This course is currently in
You'll need a GitHub account to post below. Don't have one? Post in our Odyssey forum instead.