Overview
We've saved some time and effort at the start of our GraphQL query validation process; now it's time to boost our performance on the datafetching step!
In this lesson, we will:
- Compare caching operation strings with caching data returned by methods
- Review caching in Spring Boot
- Discuss caveats around methods marked as cacheable
- Instantiate a Caffeine cache manager
- Apply the
@Cacheableand@CacheEvictannotations to our data source methods
Caching operation responses
In the last lesson, we hooked into the lifecycle of the GraphQL query execution process; by providing a PreparsedDocumentProvider instance, we could intervene to first check whether parsing and validation was actually necessary. When caching the actual data that our server resolves for an operation, we'll use a different approach.
In our datasources/ListingService file, we have a number of methods that we can use to request listing data from a REST API. We'll start by taking a look at how caching will work with one of these methods, listingRequest.
@Componentpublic class ListingService {private static final String LISTING_API_URL = "https://rt-airlock-services-listing.herokuapp.com";private final RestClient client = RestClient.builder().baseUrl(LISTING_API_URL).build();public ListingModel listingRequest(String id) {return client.get().uri("/listings/{listing_id}", id).retrieve().body(ListingModel.class);}// ... other methods}
When we run a query for a particular listing, our Query.listing datafetcher passes the listing ID in question to the listingRequest method. This method in turn uses its id argument to reach out to the REST endpoint for a particular listing, and returns the response as an instance of the ListingModel class.
When browsing the various listings available in our app, a user might bounce between multiple listing pages, comparing and contrasting features. Though we may very well have a caching solution on the frontend, we still don't want to allow the possibility of overloading our server with requests for the same listing data over, and over, and over again. (Particularly when we don't expect the listing's data to change all that often!)
Instead, we'll give our server the ability to cache the response it gets from the REST endpoint for a particular ID. Then, when requested again, it can serve up the results directly from the cache until the data is evicted.
Let's take a look at how we enable caching in Spring.
Caching in Spring
We can use the basic spring-boot-starter-cache package, along with some handy annotations, to bring data caching to life in our application.
Let's take care of bringing this package into our project now. Open up your project's build.gradle file, and add the following line to the dependencies section.
dependencies {implementation 'org.springframework.boot:spring-boot-starter-cache'// ... other dependencies}
If necessary, reload your dependencies for the new package to become active.
Here are the steps we'll follow to configure our cache.
- We'll create a new configuration file for our cache.
- We'll apply the
@Configurationand@EnableCachingannotations. - We'll define a
cacheManagermethod that instantiates a new cache manager using Caffeine, and specify how our cache should run. - Finally, we'll test out the
@Cacheableand@CacheEvictannotations on our data source methods.
Let's get into it!
Step 1: The CacheJavaConfig class
In the com.example.listings directory, on the same level as our ListingsApplication and CachingPreparsedDocumentProvider files, create a new class file called CacheJavaConfig.java.
📦 com.example.listings┣ 📂 datafetchers┣ 📂 dataloaders┣ 📂 datasources┣ 📂 models┣ 📄 CacheJavaConfig┣ 📄 CachingPreparsedDocumentProvider┣ 📄 ListingsApplication┗ 📄 WebConfiguration
Right away, let's bring in some dependencies.
import org.springframework.cache.annotation.EnableCaching;import org.springframework.context.annotation.Configuration;import org.springframework.context.annotation.Bean;import org.springframework.cache.CacheManager;import org.springframework.cache.caffeine.CaffeineCacheManager;
Next, let's use our annotations. We have two that we need to apply directly to our CacheJavaConfig class: @Configuration and @EnableCaching.
Step 2: Using @Configuration and @EnableCaching
The @Configuration annotation indicates that a particular file contains bean definitions (objects managed by the Spring container). We'll add it above our class definition.
@Configuration // 🫘 This class is a source of bean definitions!public class CacheJavaConfig {}
The @EnableCaching annotation, when applied to a configuration file, enables caching within Spring. Let's add this one too!
@Configuration@EnableCaching // 💡 Caching is switched on!public class CacheJavaConfig {}
Important to note is that these annotations do not give us an actual cache out of the box. Instead, they give us access to the caching logic that we can then apply to an actual cache implementation that we provide. To get access to all that logic, we need to provide a CacheManager instance.
Step 3: Defining a cache manager
The CacheManager interface from Spring's caching package is considered an implementation of the "cache abstraction". It acts as the "manager" for the cache that we plug in, and it provides logic to update or remove entries from the cache. Its primary concern is to consult the cache to see if a Java method actually needs to be invoked, or whether its results can be served up from the cache.
The Spring documentation indicates two steps that we need to take when using the cache manager:
- Configure the cache where the data will actually be stored
- Identify the methods whose output should be cached
The cache manager provides the rest! We create it as a bean that returns an instance of the CacheManager interface. We'll also mark it with the @Bean annotation for clarity.
@Beanpublic CacheManager cacheManager() {}
In our case, we'll use Caffeine again to create our cache. Inside the cacheManager method, we'll create a new cacheManager of type CaffeineCacheManager (which implements the CacheManager interface), and we'll pass in the name we want to give our cache: "listings".
public CacheManager cacheManager() {CaffeineCacheManager cacheManager = new CaffeineCacheManager("listings");}
We have a few ways to provide configuration to our cache. We're going to define a string that contains our configuration settings, and apply it to our cache manager using its setCacheSpecification method.
Note: For alternate ways of configuring the cache, check out the official documentation.
In this string, we'll allow an initialCapacity of 100, a maximumSize of 500, and expireAfterAccess of 2m for two minutes. We'll also pass in recordStats so that we can see cache statistics as it works.
String specAsString = "initialCapacity=100,maximumSize=500,expireAfterAccess=5m,recordStats";
To apply this string to our cache, we can call the setCacheSpecification method on our cache manager.
String specAsString = "initialCapacity=100,maximumSize=500,expireAfterAccess=5m,recordStats";cacheManager.setCacheSpecification(specAsString);
Our final step is to return the cacheManager we've created!
return cacheManager;
Step 4: The @Cacheable annotation
Our last step is to identify the methods whose output we want to be cached.
To do this, we can apply the @Cacheable annotation, specifying the name of the cache as well as any other conditions (such as where the result is not null) to consider. We can also use the @CachePut or @CacheEvict annotations to control updates to, or evictions from, the cache.
// Store the output from the method unless result is null@Cacheable(value="cacheName", unless = "#result == null")// Run the method and update its results in the cache@CachePut(value="cacheName")// Remove all items from the cache@CacheEvict(value="cacheName", allEntries=true)
Note that when @Cacheable is applied to a method, the method's output is cached as a whole. This means that if our method returns a list of objects, each object will NOT be cached separately. Instead, the entirety of the response will be stored for the next time the same method (with the same arguments) is invoked.
An important caveat about caching annotations
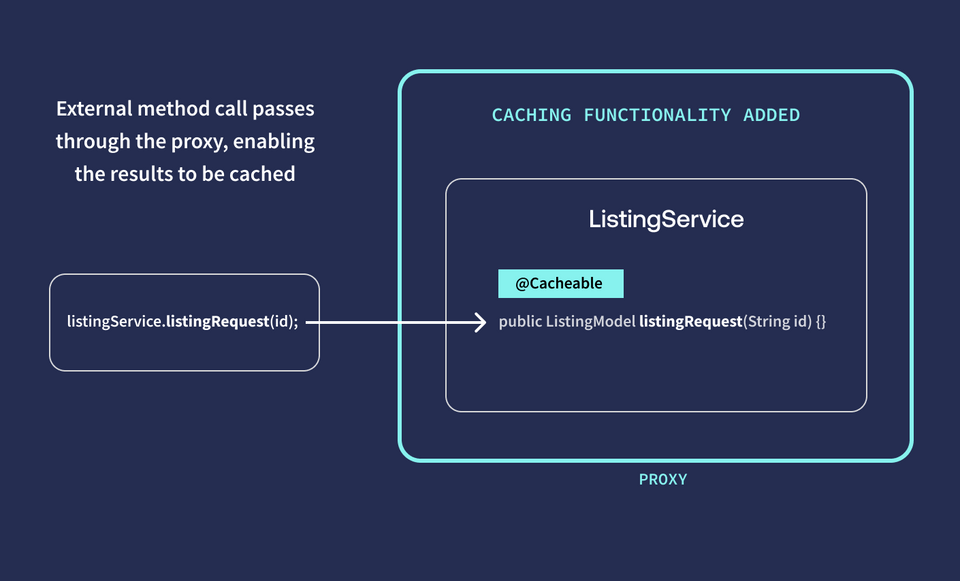
When we add one of our caching annotations, such as @Cacheable to a method, the results will NOT be cached if we call the method from within the same class.
This is because the actual caching behavior implemented in the cache is added by Spring via a proxy. You can think of this proxy as a kind of caching-functionality wrapper that encircles the class. When the methods marked @Cacheable are called from outside the class, the request runs through the caching proxy first, with caching behavior enabled, before calling the actual method.

But a request from inside the class avoids the caching proxy, and as a result has no effect on storing or updating entries in the cache.
public class ListingService {public ListingModel anotherListingServiceMethod() {// ❌ The REST API response will NOT be cached!return listingRequest("listing-2");}/* ⬇️ Calling this method from WITHIN the class avoids the proxythat provides the caching functionality! */@Cacheable(value="listings")public ListingModel listingRequest(String id) {// ...logic, logic, logic}}
Our app is structured so that all of our ListingService methods are called by methods in our datafetcher classes, so this setup by default will make use of the proxy.
Adding annotations
We'll jump into our datasources/ListingService class to put this to the test. First, we'll bring in our annotations.
import org.springframework.cache.annotation.Cacheable;import org.springframework.cache.annotation.CacheEvict;
Then let's scroll down to the method that requests one specific listing: listingRequest.
To cache the results of this method, we'll add the @Cacheable annotation. We'll use a property called value to specify the name of our cache, "listings".
@Cacheable(value="listings")public ListingModel listingRequest(String id) {// method body}
Our client might query for a listing with an ID that doesn't actually exist, so let's add something extra to our annotation here. We'll include a property called unless. Here we can define our condition: if the listing is null, don't put it in the cache.
@Cacheable(value="listings", unless = "#result == null")
Let's try it out! Restart your server, then return to Sandbox.
We'll run a query for a specific listing, so that we hit this underlying method we've just marked as "cacheable". Add the following GraphQL query to your Operation panel.
query GetListingAndAmenities($listingId: ID!) {listing(id: $listingId) {titledescriptionnumOfBeds}}
And in the Variables panel:
{"listingId": "listing-2"}
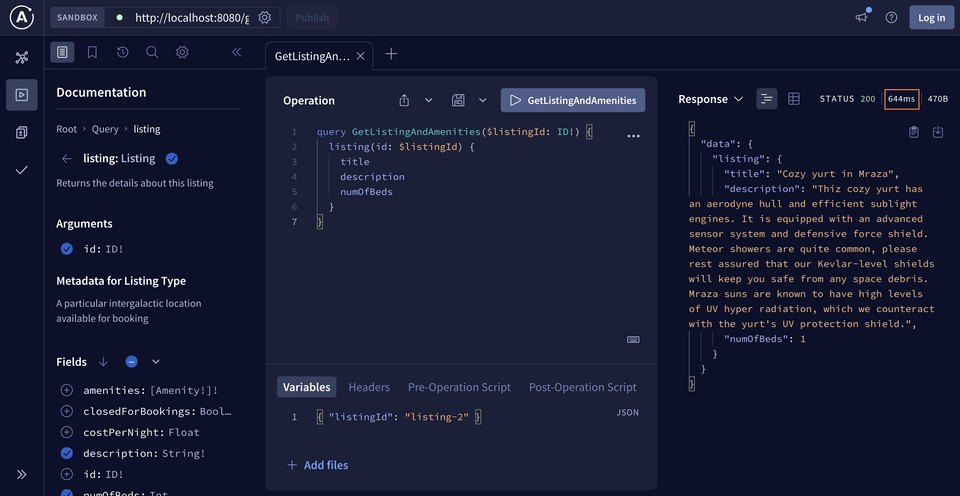
Run the query and... well, yes, data as expected. But take note of the number of milliseconds at the top of your Response panel. We might be looking at something upwards of 300ms.

That's our benchmark; now let's try that query again!
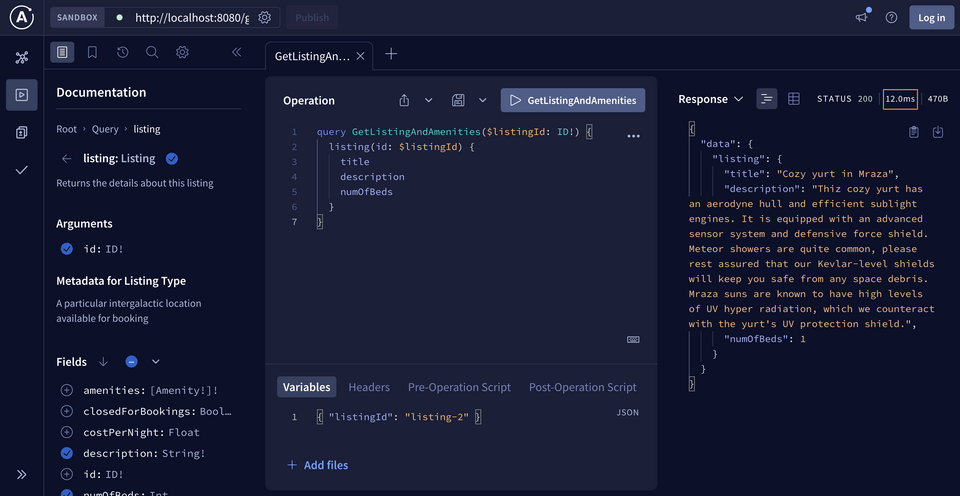
Hit the play button on the exact same query once more.

Did you see a big drop in the number of milliseconds recorded? Now we should be down in the 10-20 millisecond range, depending on your internet speed. Our data has been cached, and we can definitely see the improvement!
Using @CacheEvict
Our individual listings are being saved in the cache as we query for them. Now, let's test out the flip side of caching: eviction.
We can apply the @CacheEvict annotation to any one of our methods. With this annotation, we can clear ALL of our entries, or one in particular. We'll try evicting everything.
Back in ListingService, add the @CacheEvict annotation to the featuredListingsRequest method. We'll specify the name of our cache, "listings", and then pass an additional property: allEntries = true. This will take care of clearing all the entries from our cache as a whole whenever the method is called.
@CacheEvict(value="listings", allEntries = true)public List<ListingModel> featuredListingsRequest() throws IOException {// ... logic}
Restart your server and jump back into Sandbox.
There's nothing in our cache yet, so let's put a few things in there that we can evict in a moment. Run the following query, swapping in each of the following listing IDs in the Variables panel: "listing-1", "listing-2", and "listing-3".
query GetListingAndAmenities($listingId: ID!) {listing(id: $listingId) {titledescriptionnumOfBedsamenities {categoryname}}}
After you've run the query a few times, open up a new tab in Explorer. Let's build a new query using the featuredListings field; its datafetcher calls the ListingService's featuredListingsRequest method we added our eviction annotation to.
Add the following GraphQL query to the Operation panel.
query GetFeaturedListings {featuredListings {idtitle}}
Run the query and... we'll see data, but that's not what we're interested in! Back in our server's terminal, we'll see a log from our cache.
Invalidating entire cache for operation
Now try that first query again, for any one of the listing IDs you provided previously.
query GetListingAndAmenities($listingId: ID!) {listing(id: $listingId) {titledescriptionnumOfBedsamenities {categoryname}}}
We'll see that now our response time has jumped back up again! The operation was removed from the cache.
Try evicting just a single entry from the cache! See if you can find different ways to use @Cacheable, @CacheEvict, and even @CachePut if you're up for a challenge. Can you tell the difference between @Cacheable and @CachePut? (Hints in the collapsible below!)
Practice
Drag items from this box to the blanks above
@Cacheable@CacheDatadatafetching
a cache manager
a POJO class
DGS caching
caching
within the same class
outside the class
proxy
Spring caching
Key takeaways
- In contrast to how we cached operation strings, we can configure a separate cache that stores the output of calling a method
- We can enable caching in our project using the Spring Boot Starter Cache and a series of annotations:
- The
@Configurationannotation is used to indicate a file contains bean definitions - The
@EnableCachingannotation enables the caching feature in Spring - The
@Cacheable,@CachePut, and@CacheEvictannotations can be applied to Java methods to determine how their output should be handled in the cache
- The
- A cache manager gives us a number of out-of-the-box cache operations we can apply directly to our cache data store
- We can create a new Caffeine-powered cache manager and provide specification as a string using the
setSpecificationmethod
Journey's end
You've made it to the end—and we've seen our processing time drop a huge number of milliseconds along the way! Our server's now caching our operation strings to serve them up more efficiently. Simultaneously, we've discovered how to cache responses from our data sources and reuse them in future requests.
Thanks for joining us in this course, and we can't wait to see you in the next.
Share your questions and comments about this lesson
This course is currently in
You'll need a GitHub account to post below. Don't have one? Post in our Odyssey forum instead.