Overview
Let's start to bring our subscription operations to life. We'll start by adding our Subscription type, and finish by running our supergraph locally with rover dev.
In this lesson, we will:
- Introduce the
Subscriptiontype in themessagessubgraph - Add a corresponding
Mutationfield to send a new message - Launch our supergraph with
rover dev - Save the operations we'll use throughout the course
The chat feature and the schema
Before we write our resolver logic, let's walk through exactly how we want our chat feature to work.
To enable realtime communication between guest and host, we have a few considerations.
- We'd first need to create a conversation for all of our messages to go to.
- Next, we'd need a way to send a message to a particular conversation.
- We also need a way to subscribe to messages in a particular conversation (so we're notified whenever a new message is sent!)
It's clear that we need to add some new types and fields to our schema to support this feature. This is a course about subscriptions, so let's start with the Subscription type!
Adding the Subscription type
Open up the messages directory, and navigate to the schema.graphql file in the src folder.
Our schema needs an operation that will enable us to listen for messages in a particular conversation. We'll define this as our new Subscription type's very first field—so make some room in the file and add the following code.
type Subscription {"Subscribe to new messages in a conversation"messageInConversation(id: ID!): Message}
As we discussed in the last lesson, this field accepts an id for the conversation it's listening to. With each new event, it returns the Message that was sent to the conversation. (Or, at least, that's what we'll wire up this field to do! For now, we're still missing the resolver logic.)
That's it for the Subscription type—but we're not done with our schema just yet.
Adding the new Mutation field
Next, find the Mutation type in schema.graphql. Right now you'll see it has just one field: createConversation. This field accepts a recipientId and returns a new Conversation (between whoever is logged in, and that recipient).
type Mutation {"Start a new conversation with a particular user"createConversation(recipientId: ID!): Conversation}
We've already got a way to create a conversation; now we need a way to send new messages to it! For that we'll need a new Mutation field.
Let's add a new field called sendMessage.
type Mutation {"Initiate a new conversation with a particular user"createConversation(recipientId: ID!): Conversation"Submit a new message to a specified conversation"sendMessage}
We'll need to send some data along when we call this field, so we'll provide an argument called message. Rather than setting it as a Message type, however, we'll make use of the NewMessageInput type located further down in our schema. This lets us specify both text as well as conversationId so that the message we send ends up in the right place. And let's be sure to make our NewMessageInput non-nullable—no empty messages allowed!
sendMessage(message: NewMessageInput!)
Finally, for our field's return type, we'll just return the Message that we created.
sendMessage(message: NewMessageInput!): Message
Note: You can learn more about the input type, as well as other GraphQL types and features in Side Quest: Intermediate Schema Design.
Booting up rover dev
Our schema is all set, but we still haven't actually gotten our graph up and running. We're in development mode, so let's try things out locally. The Rover CLI gives us a way of doing just that: with the rover dev command.
With rover dev, we can feed in the data about our locally running subgraphs. Rover takes care of booting up a local router, which we can then execute operations against. It's everything we need to validate the types, fields, and logic we add to our graph.
Note: As we mentioned, rover dev is a great tool for development. It's important that you do not run this command in production!
We're going to provide Rover with a configuration file that tells it where to find our running subgraphs and read their schemas.
Good news—this configuration file already exists inside our router directory! Jump in there, and let's open up supergraph.yaml.
📦 router┣ 📄 router-config.yaml┣ 📄 supergraph.yaml┗ 📄 .env
Here's what's inside:
federation_version: =2.8.0subgraphs:accounts:routing_url: http://localhost:4002schema:file: ../accounts/src/schema.graphql # Schema provided via filemessages:routing_url: http://localhost:4001schema:file: ../messages/src/schema.graphql # Schema provided via file
It's just a few lines, but this file tells Rover exactly how to run and where to find the subgraphs to compose into a supergraph. We've provided the details for both accounts and messages: where they're running, and the relative path to their schema file.
The rover dev command
To run rover dev, we'll need to first provide our graph credentials: this is what connects Rover to our Studio organization and the graph we created in the first lesson of this course. You'll need both of the values we stored in router/.env.
Let's open up a terminal to the router directory and build out our command.
APOLLO_KEY="..." \APOLLO_GRAPH_REF="..." \rover dev \--supergraph-config supergraph.yaml
Make sure you swap in your unique values for both APOLLO_KEY and APOLLO_GRAPH_REF.
This command first connects Rover to our graph in Studio and determines that we have Enterprise permissions. Next, it boots up the rover dev process, and feeds in the supergraph.yaml file we wrote as the configuration that Rover should use when composing a local supergraph.
When you run this command, you should see a bunch of output in the terminal:
supergraph config loaded successfullydownloading the 'supergraph' plugin from https://rover.apollo.dev/tar/supergraph/x86_64-apple-darwin/v2.8.0warning: Do not run this command in production! It is intended for local development only.==> Watching /messages/src/schema.graphql for changes==> Watching /accounts/accounts.graphql for changesWARN: telemetry.instrumentation.spans.mode is currently set to 'deprecated', either explicitly or via defaulting. Set telemetry.instrumentation.spans.mode explicitly in your router.yaml to 'spec_compliant' for log and span attributes that follow OpenTelemetry semantic conventions. This option will be defaulted to 'spec_compliant' in a future release and eventually removed altogether==> your supergraph is running! head to http://localhost:4000 to query your supergraphsuccessfully composed with version =2.8.0
Great! Let's open up http://localhost:4000 in the browser where the router is running.
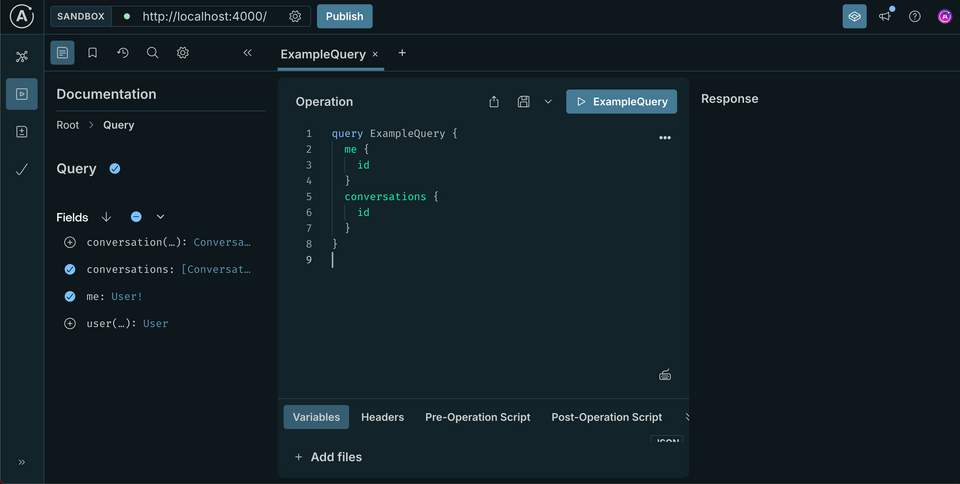
This places us in the Sandbox Explorer; it's a development environment where we can build operations and run them against our supergraph.
Testing out the supergraph
Our graph is up and running! And because our database has been pre-seeded with some data, we can run a few operations to test it out.
Try the following operation:
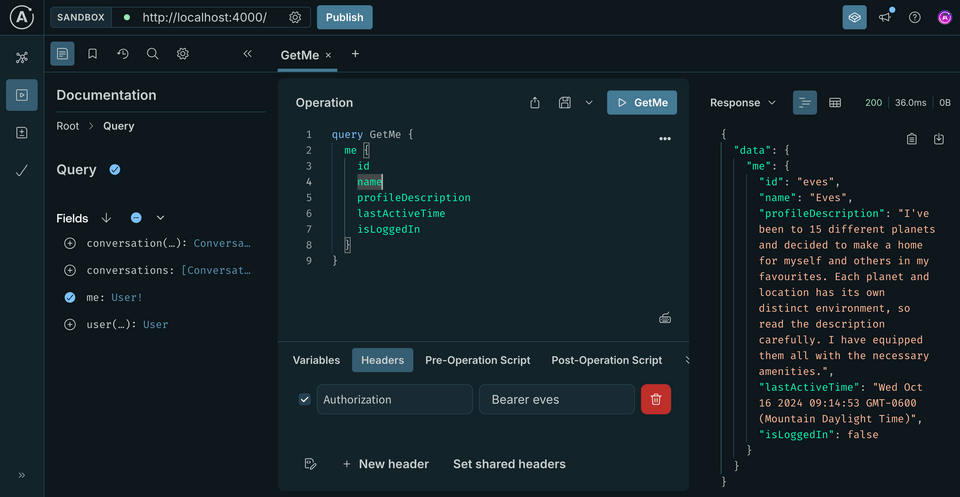
query GetMe {me {idnameprofileDescriptionlastActiveTimeisLoggedIn}}
If you run this operation as-is, you'll see an error in the Response panel. This is because we actually need to be authenticated first.
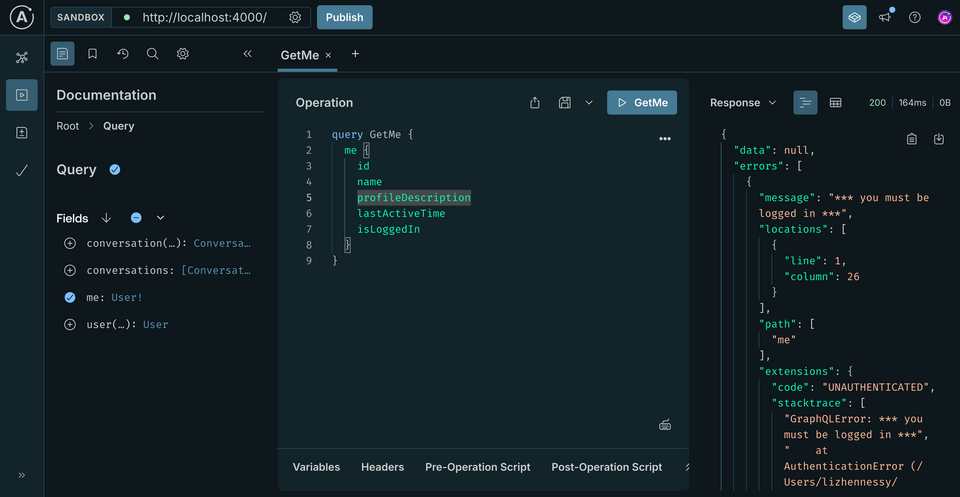
We can fix this by clicking on the Headers tab, located on the window at the bottom of the Operation panel. Next, we'll click on the New Header button.
This gives us a space where we can define a header key and value.
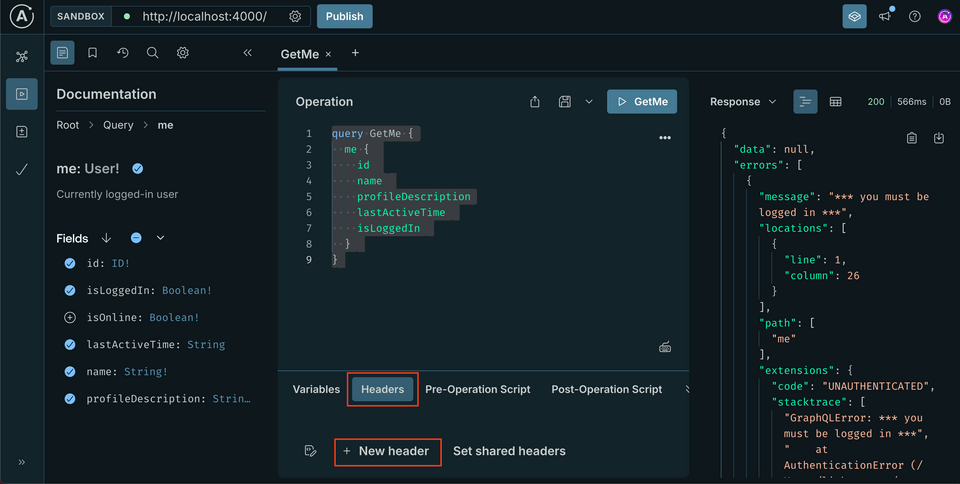
To satisfy our accounts subgraph, we need to provide a header called Authorization and a value of Bearer <TOKEN>.
Configuring our header
Let's add our header now: we'll stick with a user ID we know is in our database: eves.
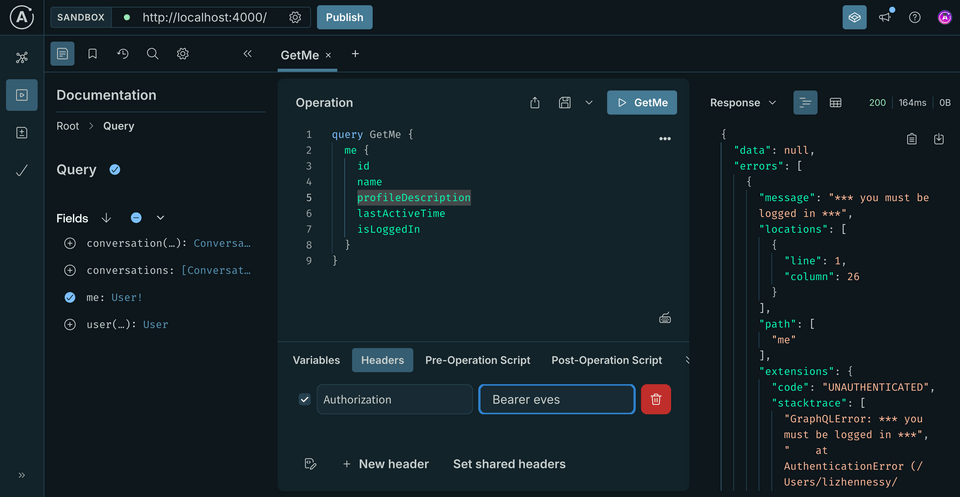
Authorization: Bearer eves
Pro tip: Click the little file and pencil icon next to + New Header. Here you can simply copy and paste your headers into place, and they'll be reformatted in the Headers tab automatically!
But if we run this operation... we'll still see the same error. This is because we're sending our query directly to the router running through rover dev; and the router doesn't automatically propagate headers to the underlying subgraphs.
We need to provide specific instruction about which headers it should pass along, and which subgraphs it should pass them to! Fortunately, our project already includes this configuration in our router/router-config.yaml file (take a peek if you're curious). We just need to revise our rover dev command to include it.
Stop the running rover dev process, and rerun the command, this time providing the --router-config flag shown below. We'll use this flag to specify the path to our router-config.yaml file.
APOLLO_KEY="..." \APOLLO_GRAPH_REF="..." \rover dev \--supergraph-config supergraph.yaml \--router-config router-config.yaml
Unlike --supergraph-config (which stated where the Rover process could gather up all of our subgraph-specific details) this new --router-config flag applies specifically to the router process.
Now let's take that operation for a spin again. And we've got data!
Saving operations
Next, let's write out the operations we'll use for the remainder of the course. Because we'll be using these operations over and over again, it's a good idea to save them in an operation collection.
The first will subscribe us to a particular conversation. Open up a new tab and paste the following operation.
subscription SubscribeToMessagesInConversation($messageInConversationId: ID!) {messageInConversation(id: $messageInConversationId) {textsentTime}}
The second operation will send a new message to a given conversation. Open up another new tab and paste in the following operation.
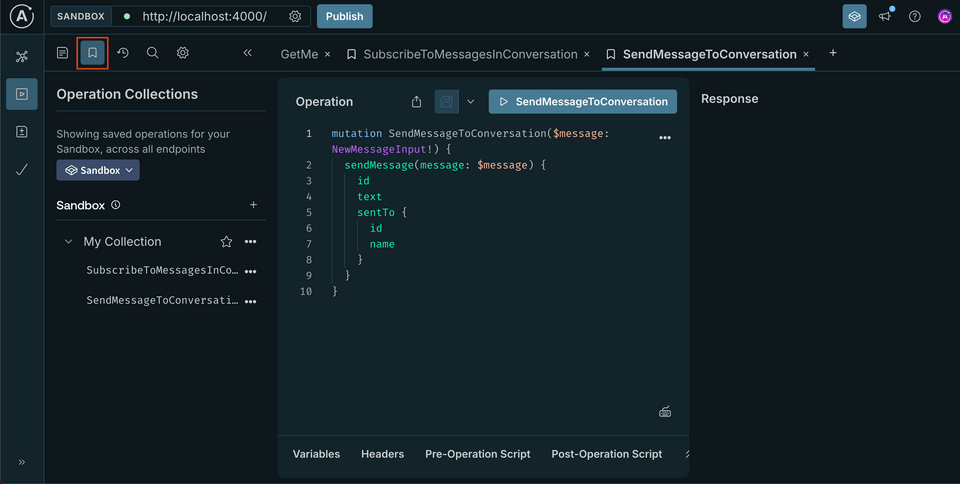
mutation SendMessageToConversation($message: NewMessageInput!) {sendMessage(message: $message) {idtextsentTo {idname}}}
Just above each operation, you'll see a Save operation button.
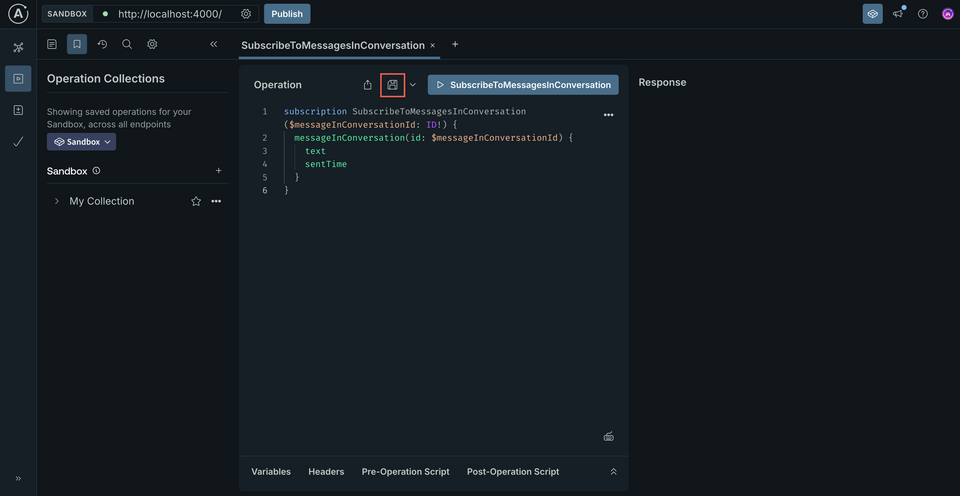
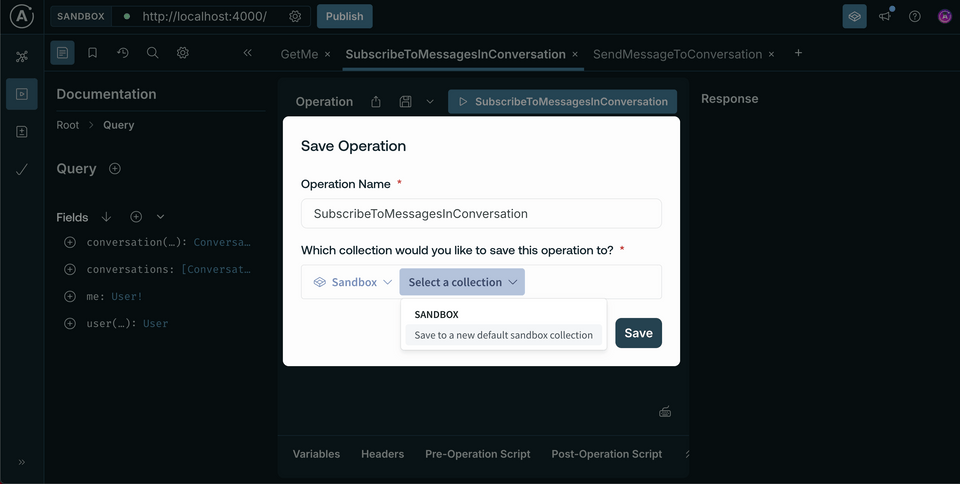
When you click this button, a modal appears prompting you to provide the operation name as well as the collection you want to save it to. We can click the Select a collection dropdown and choose Save to a new default Sandbox collection.
Let's take a little time to save these operations. We can then access them again by clicking on the bookmark icon above the Documentation panel. This opens up all of our saved operation collections, where we can easily add them back to the Operation panel.
Practice
rover dev?Key takeaways
- With
rover dev, we can run a supergraph locally. - To configure the
rover devprocess, we can pass a configuration file using the--supergraph-configflag. This file contains details about the subgraphs that should be composed, as well as where each schema can be found or introspected. - We can provide a
--router-configflag to therover devprocess to further customize how the locally-running router behaves. - Operation collections in Explorer allow us to define and save operations we'll need to access again in the future.
Up next
We're schema complete, but we're missing all the logic that will make our subscription work. Before we dive into the plumbing in our resolvers, let's make sure our locally-running router is set up to understand the subscription operations we're going to send it.
Share your questions and comments about this lesson
Your feedback helps us improve! If you're stuck or confused, let us know and we'll help you out. All comments are public and must follow the Apollo Code of Conduct. Note that comments that have been resolved or addressed may be removed.
You'll need a GitHub account to post below. Don't have one? Post in our Odyssey forum instead.