Overview
We can now query data from our REST API directly, but a list of featuredListings is all we can ask about. Let's give our querying capabilities another option!
In this lesson, we will:
- Explore query arguments in GraphQL
- Supplement the schema's
Querytype with an additional endpoint - Pass variables into a GraphQL query
Introducing query arguments
It's time to give our Query type another entrypoint—and with it, a new feature for our API!
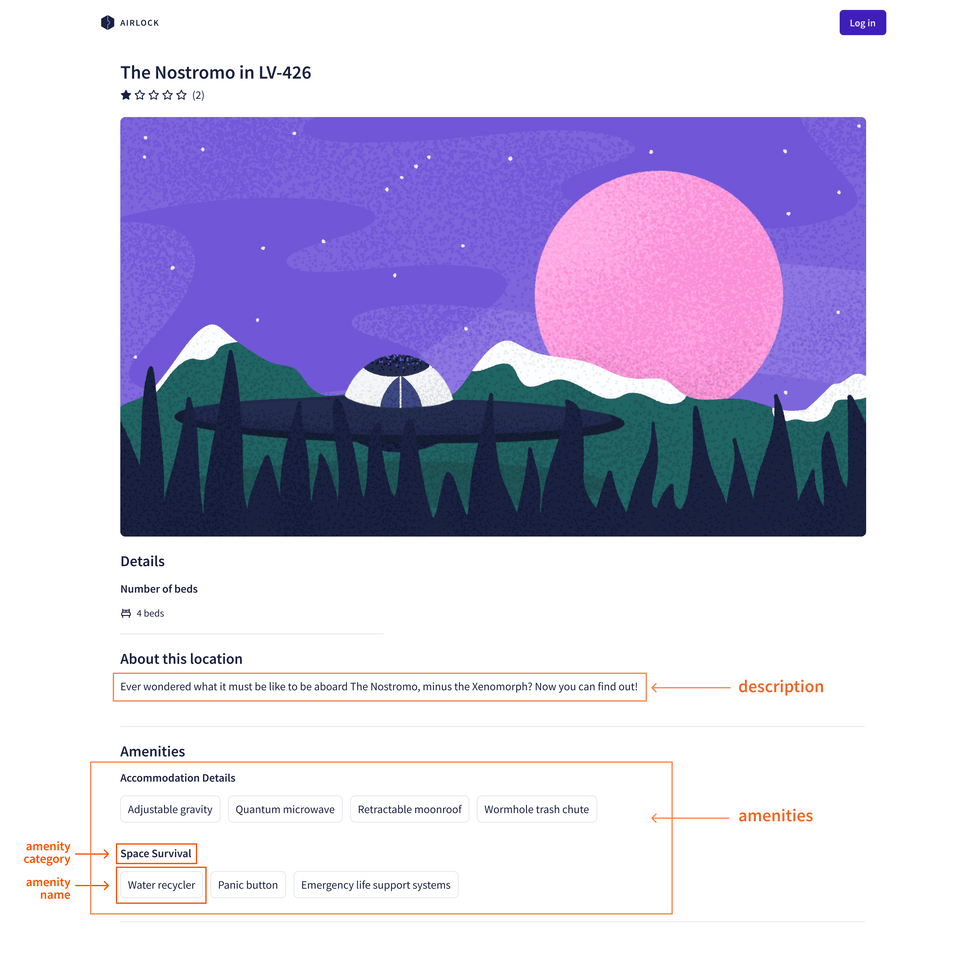
While we can get a list of the featured listings from our REST API, we don't yet have a way to ask for a specific listing's details. This single Query entry point doesn't meet the needs of all our mockups; and our Listing type is still missing a few fields to hold its description and amenities!

Querying the /listings/{listing_id} endpoint
Let's return to our listings REST API endpoint. So far, we've only explored the GET /featured-listings endpoint, but we have another option available for fetching a specific listing's data: GET /listings/{listing_id}.
We can use this link to make a request for a specific listing. (Notice that we've passed in the value listing-1 in place of the query variable, {listing_id}!)
https://rt-airlock-services-listing.herokuapp.com/listings/listing-1
Here's a snippet of some of the properties included in the response:
{"id": "listing-1","title": "Cave campsite in snowy MoundiiX","description": "Enjoy this amazing cave campsite in snow MoundiiX, where you'll be one with the nature and wildlife in this wintery planet. All space survival amenities are available. We have complementary dehydrated wine upon your arrival. Check in between 34:00 and 72:00. The nearest village is 3AU away, so please plan accordingly. Recommended for extreme outdoor adventurers.",// ... more listing properties"amenities": [{"id": "am-2","category": "Accommodation Details","name": "Towel"},{"id": "am-10","category": "Space Survival","name": "Oxygen"}// ... other amenities]}
Everything we need is here (along with some additional properties we'll put to use soon)!
To bring this functionality into our GraphQL API, we'll need to add another entry point to our schema. We'll be able to specify which unique listing we're querying for by giving this field an argument.
🤔 How to use arguments
An argument is a value you provide for a particular field in your query. The schema defines the arguments that each of your fields accepts.
Your resolvers can then use a field's provided arguments to help determine how to populate the data for that field. Arguments can help you retrieve specific objects, filter through a set of objects, or even transform the field's returned value. A query that performs a search usually provides the user's search term as an argument.
To define an argument for a field in our schema, we add parentheses after the field name. Inside, we write the name of the argument followed by a colon, then the type of that argument, like String or Int. If we have more than one argument, we can separate them with commas.
Adding the listing field
Pop open the schema.graphql file, and add the following field to the Query type.
listing: Listing
We'll give the field a description, and then add parentheses after listing to specify its argument: id, of type ID!.
"Returns the details about this listing"listing(id: ID!): Listing
And that's it for the query definition! We now have our schema up-to-date for the feature we're implementing. Onwards to our ListingAPI: let's add a new method to hit this endpoint!
Updating ListingAPI
Let's return to our ListingAPI class in listing-api.ts and give it a new method that can reach out to this endpoint.
Just below our getFeaturedListings method, we'll add a new method called getListing that accepts a listingId parameter, which is a string.
getListing(listingId: string) {// TODO}
This method will make a GET request to the /listings/{listing_id} endpoint we just tested. We can use the this.get method, passing it the endpoint and including the listingId argument. Then, we'll return the results!
getListing(listingId: string) {return this.get(`listings/${listingId}`);}
Our method's return type still shows Promise<any>. We know that the Promise will resolve to a singular Listing type, so we can update that here. We'll also pass the Listing in as a type variable to our this.get method.
getListing(listingId: string): Promise<Listing> {return this.get<Listing>(`listings/${listingId}`);}
Next up: the resolver function.
Using arguments in resolvers
Open up the resolvers.ts file. Following the same structure as our schema, we'll add a new key inside the Query object (just below the featuredListings function), named listing.
Query: {featuredListings: (_, __, { dataSources }) => {return dataSources.listingAPI.getFeaturedListings();},listing: () => {}},
When we query our GraphQL API for the listing field, the id argument we pass is automatically conveyed to this resolver.
To access the argument, we need to use resolver's second position parameter, args. args is an object that contains all GraphQL arguments that were provided for the field. We can destructure this object to access the id property. We'll also need to destructure the third positional parameter for its dataSources property.
listing: (_, { id }, { dataSources }) => {},
Next, in the body of the resolver function, we'll use the dataSources.listingAPI.getListing, passing it the id.
listing: (_, { id }, { dataSources }) => {return dataSources.listingAPI.getListing(id);},
We need to update our generated types to account for this new listing field in our schema, but while we're here, let's update our project so it automatically regenerates types every time our schema changes.
Jump into package.json. We're going to tweak our dev and generate scripts.
"dev": "concurrently \"ts-node-dev --respawn --watch ./**/*.graphql ./src/index.ts\" \"npm run generate\"",
This update lets us run two scripts concurrently: the first is ts-node-dev, which we used previously. This command reboots our app from index.ts anytime a change is made in the project. The second script that we run is npm run generate, with a --watch flag.
Next, let's update our generate script.
"generate": "graphql-codegen --watch \"src/schema.graphql\""
This addition lets us tell the GraphQL Code Generator explicitly to watch our src/schema.graphql file, and rerun the codegen process. As a result, anytime our project changes, we'll get the same hot reload we've enjoyed—along with an updated types.ts file anytime our schema changes!
Cool, let's try it out. Restart your server with the following command:
npm run dev
We should see a lot more output—first and foremost, that types have been generated—followed by the usual output that the server is running.
Testing the listing field
Let's return to the Explorer at http://localhost:4000.
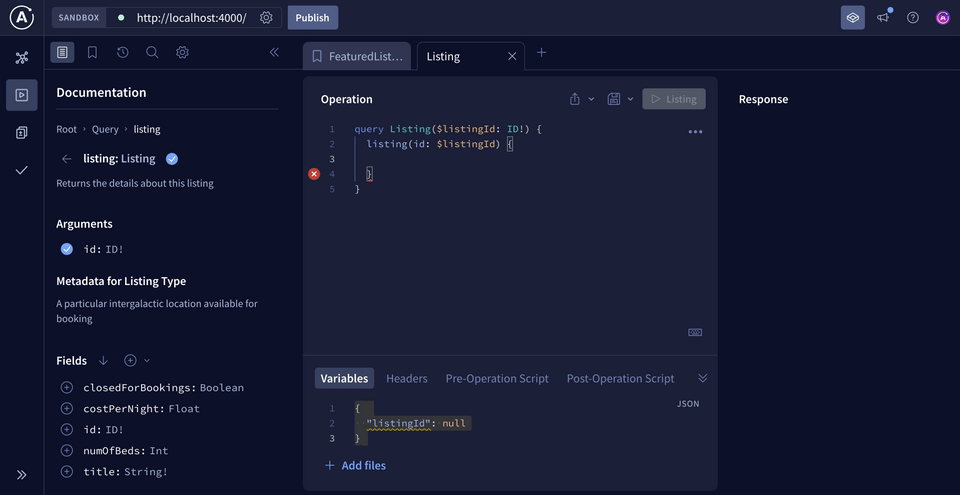
In the Documentation panel we'll see that our Query type contains our new listing field. When we click into it we can even see the name and the type of data it receives as an argument. Let's add a new workspace tab, then click the plus button beside the listing field to add it to our query.
The Explorer automatically inserts some syntax for us to make completing the query easier.

Let's update our operation name to GetListing to be extra clear about what we're doing with the data we request.
query GetListing($listingId: ID!) {listing(id: $listingId) {}}
You'll notice something new here: a dollar sign ($) followed by the name listingId.
The $ symbol indicates a variable in GraphQL. The name after the $ symbol is the name of our variable, which we can use throughout the query. After the colon is the variable's type, which must match the type of the argument we'll use it for. Variables are great—they let us pass argument values dynamically from the client-side so we don't have to hardcode values into our query. We'll use them every time we create a query with arguments.
In our case, we have a variable called listingId that the Explorer set up for us down in the Variables section. Right now, it's set to null, but let's replace it with the listing ID we've been testing so far: listing-1.
Add the following to the Variables section in the Explorer:
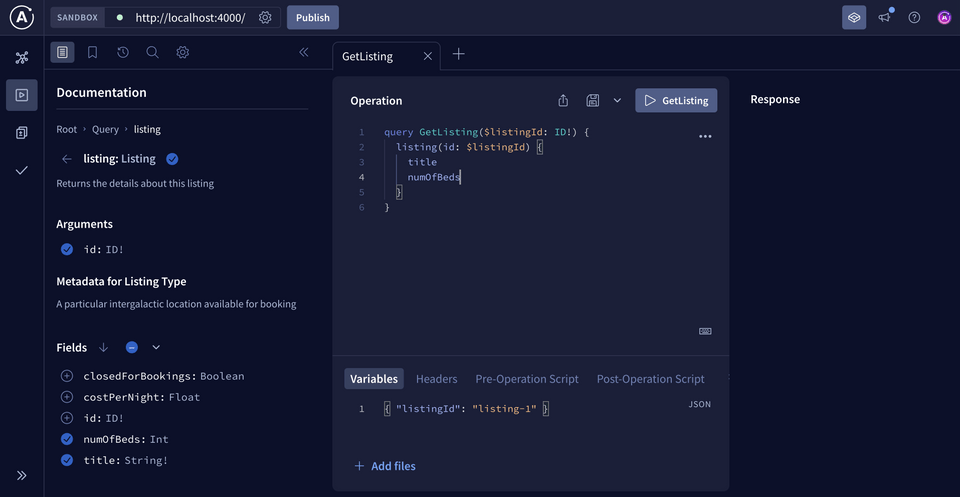
{ "listingId": "listing-1" }
Let's test out our query by adding a few more fields for the listing we're after: title and numOfBeds.

The Operation panel of the Explorer should now look like this:
query GetListing($listingId: ID!) {listing(id: $listingId) {titlenumOfBeds}}
When we click on the run query button, we see the data we're expecting!
This works great, but we're still missing a couple of fields to complete our mock-up for an individual listing. When we check the REST API response for listings, we'll see that each listing JSON object contains a "description" key; so let's go ahead and update our Listing type to include this.
Back in schema.graphql, add the description field shown below.
type Listing {id: ID!"The listing's title"title: String!"The listing's description"description: String!"The number of beds available"numOfBeds: Int!"The cost per night"costPerNight: Float!"Indicates whether listing is closed for bookings (on hiatus)"closedForBookings: Boolean}
But what about that list of amenities we see in our mock-up for a single listing?

We're still missing this data about each amenity—and even in our JSON response, it looks a bit more complicated than the schema fields we've explored so far—each amenity has an "id", "name", and "category"!
{"id": "listing-1",// ... other listing properties"amenities": [{"id": "am-2","category": "Accommodation Details","name": "Towel"},{"id": "am-10","category": "Space Survival","name": "Oxygen"}// ... other amenities]}
Let's tackle bringing amenity data into our API in the next lesson.
Practice
Drag items from this box to the blanks above
@
arguments
null
$
resolvers
schema
graph
name
hardcoded
!
Update the schema below to add two new entry points: 1) galaxy to query for a specific galaxy, which takes an argument id of type non-nullable ID and returns a non-nullable Galaxy. 2) planets, which takes two arguments: galaxy of nullable type String (to specify the galaxy name the planet belongs to), and minPopulation of nullable type Int (to filter for planets with a minimum population). This field returns a nullable array of nullable Planet types.
Add a resolver for the Query.galaxy field. This function should receive an argument called id, and return the results of calling galaxyService.getGalaxy(id) on the server's dataSources context property.
Key takeaways
- Query arguments allow us to filter, customize, and further specify the data we'd like to query.
- We can access a field's query arguments through its resolver function's second positional parameter,
args. - The
$symbol indicates a variable in GraphQL. The name after the$symbol is the name of our variable, which we can use throughout the query. After the colon is the variable's type, which must match the type of the argument we'll use it for.
Up next
In the next lesson, we'll explore how we build a relationship between object types—specifically, between our Listing GraphQL type and a new type we'll call Amenity.
Share your questions and comments about this lesson
Your feedback helps us improve! If you're stuck or confused, let us know and we'll help you out. All comments are public and must follow the Apollo Code of Conduct. Note that comments that have been resolved or addressed may be removed.
You'll need a GitHub account to post below. Don't have one? Post in our Odyssey forum instead.