Overview
In this module we will cover how to support JWT authentication and scope-based authorization through the GraphOS Router.
By enabling these features on the router, we can enforce security closer to the edge, reducing unnecessary compute at our subgraphs and downstream services.
This module is split up into 2 sections: authentication and authorization.
Authentication
Directives in focus: @authenticated
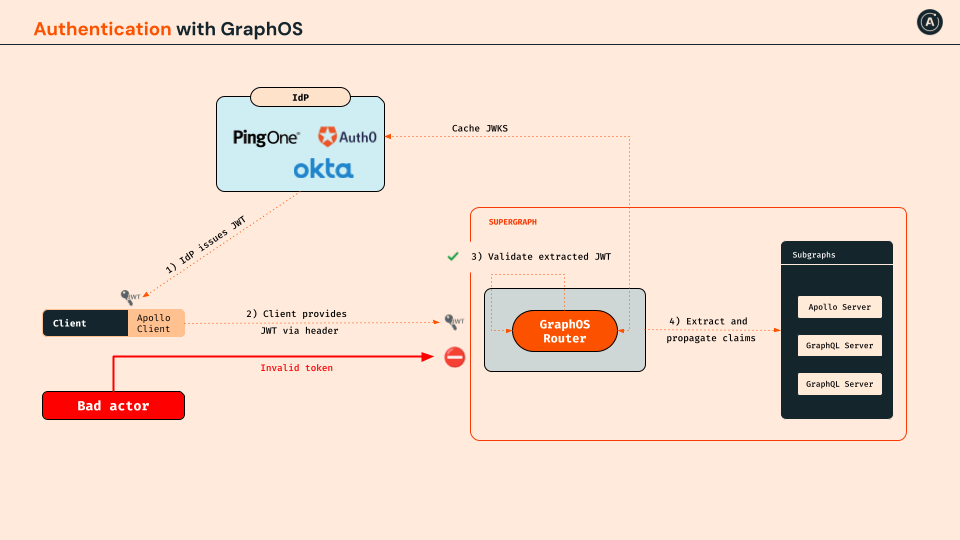
We'll be using GraphOS Explorer to authenticate with an IdP (Identity Provider) to issue us a JWT (JSON Web Token) to send for subsequent GraphQL calls.
To streamline this process, we've already provided a configured identity provider with Google Cloud Identity. The diagram below provides an overview of all the various steps that are happening through the lifecycle of the request.
Step 1: Configuring the router
Let's edit the router configuration (./router/router.yaml) to allow the router to validate the JWT.
Open up the
./router/router.yamlfile in GitHub.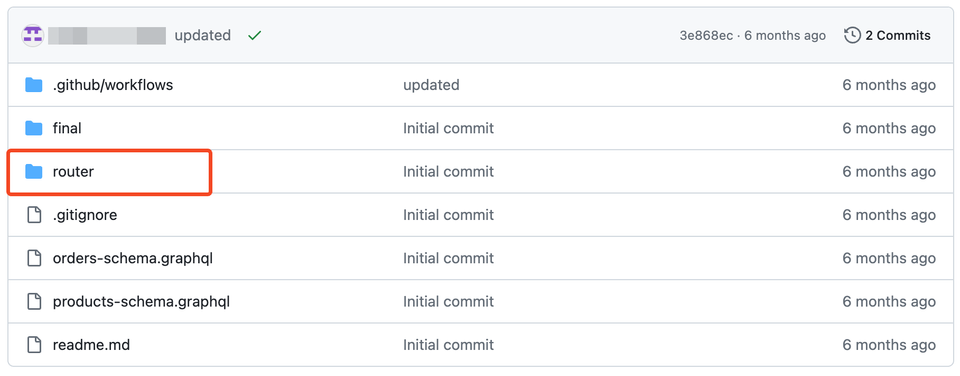

Copy the configuration below and paste it at the end of the
router.yamlfile:./router/router.yaml## Authentication and Authorization Moduleauthentication:router:jwt:header_name: Authorizationheader_value_prefix: Bearerjwks:- url: https://www.googleapis.com/service_accounts/v1/jwk/securetoken@system.gserviceaccount.comauthorization:require_authentication: falsepreview_directives:enabled: trueWith this configuration, the router will look for a
Authorizationheader and extract the base64-encoded JWT after theBearerprefix.Commit your changes.
Step 2: Update the schema to use @authenticated
The @authenticated directive can be marked on specific fields or types where authentication is required.
If the request is unauthenticated, the router will remove any fields that are @authenticated before creating the query plan.
Let's try authenticating the order(id: ID!) field in the orders subgraph schema.
Open the
orders-schema.graphqlfile located in the root folder of the repository.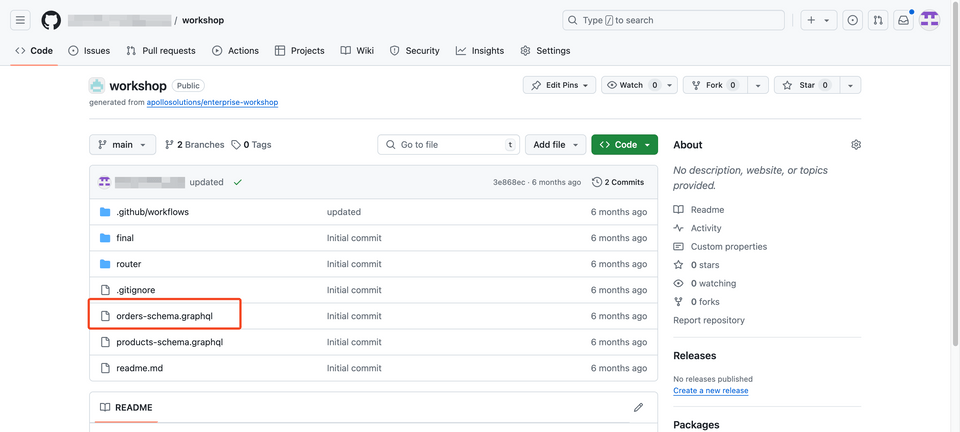
Add the
@authenticateddirective within your imports in the@linkdirective../orders-schema.graphqlextend schema@link(url: "https://specs.apollo.dev/federation/v2.8", import:["@key","@tag","@shareable","@authenticated"])Append the
@authenticateddirective to the rootQueryfieldorder(id: ID!).type Query {"""Get a specific order by id. Meant to be used for a detailed view of an order"""order(id: ID!): Order @authenticated}Commit your changes and they will be automatically published to GraphOS.
It's that simple--no further changes were needed in the code!
Check your work: Testing the authentication policy
To keep things simple, we'll use Explorer with a pre-loaded preflight script that will handle the authentication for the client-side to pass over to the GraphOS Router.
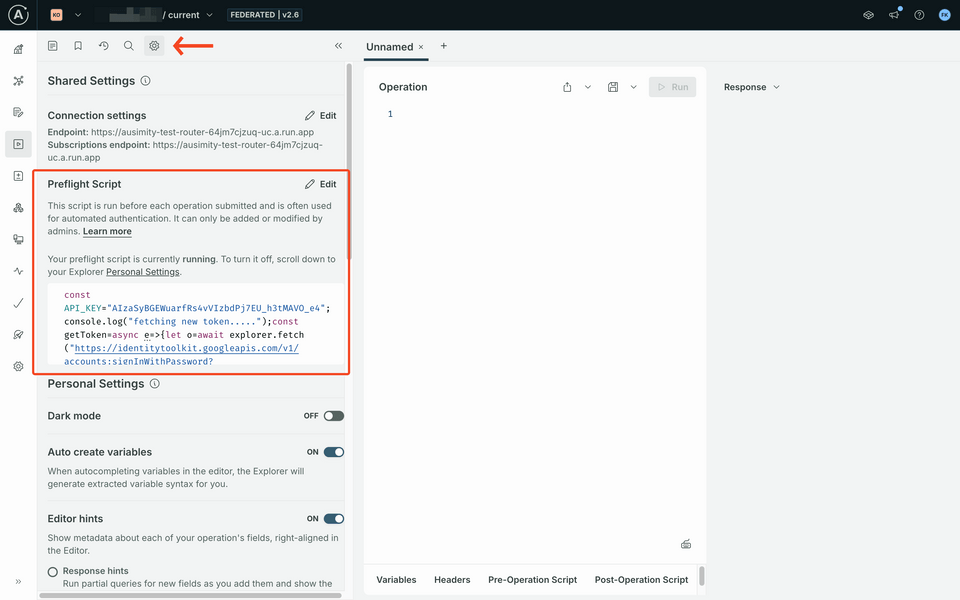
If you don't see this on your Explorer settings, take a look at the troubleshooting section below.
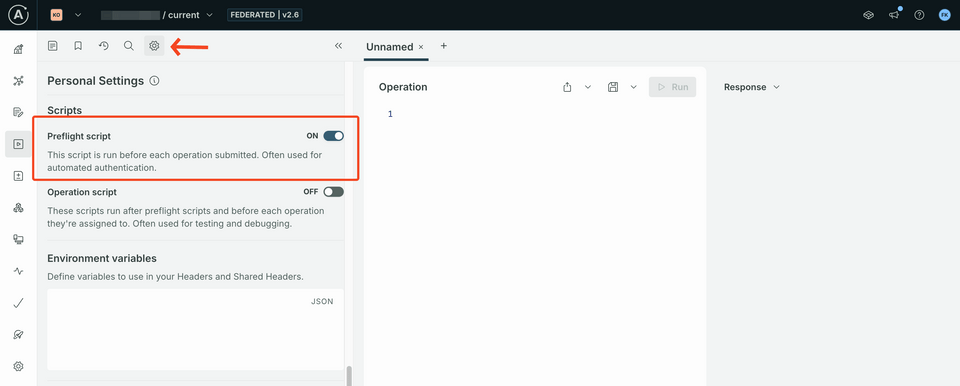
Enable the preflight script
Select the cog icon in Explorer, and edit your Personal Settings to turn on the Preflight Scripts.
Test a query without authentication headers
Create a new tab for your operation by clicking the top
+icon at the top of the Explorer tabs.https://studio.apollographql.com
Build a query for the newly authentication-enforced field with the order id set to
"1". You can either build it using Explorer or copy and paste the query below:query order($orderId: ID!) {order(id: $orderId) {idbuyer {emailfirstName}items {pricesizecolorwayid}}}In the Variables panel, copy and paste the following JSON payload:
{ "orderId": "1" }Execute the operation with the Play button in the top-right corner.
As expected, you will get an error as the result of this operation:
UNAUTHORIZED_FIELD_OR_TYPE.https://studio.apollographql.com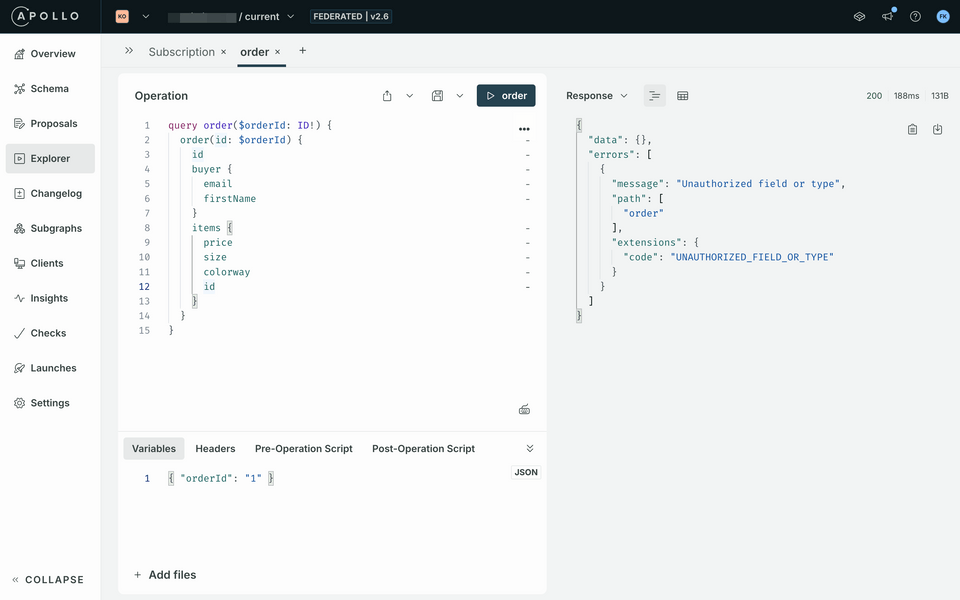
Test a query with authentication headers
To make an authenticated request, let's add an authorization header with an authenticated JWT.
Click + New Header in the Headers panel located next to Variables.
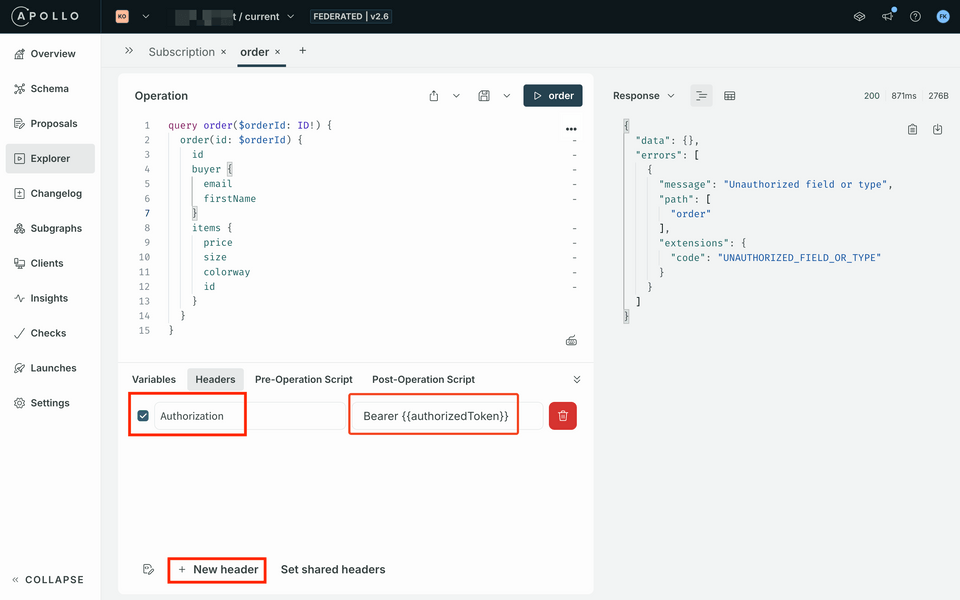
Use the following key-value for the new header:
Header Value Authorization Bearer {{authorizedToken}}Run the query again. In this case, we should see that data is returned as expected!
https://studio.apollographql.com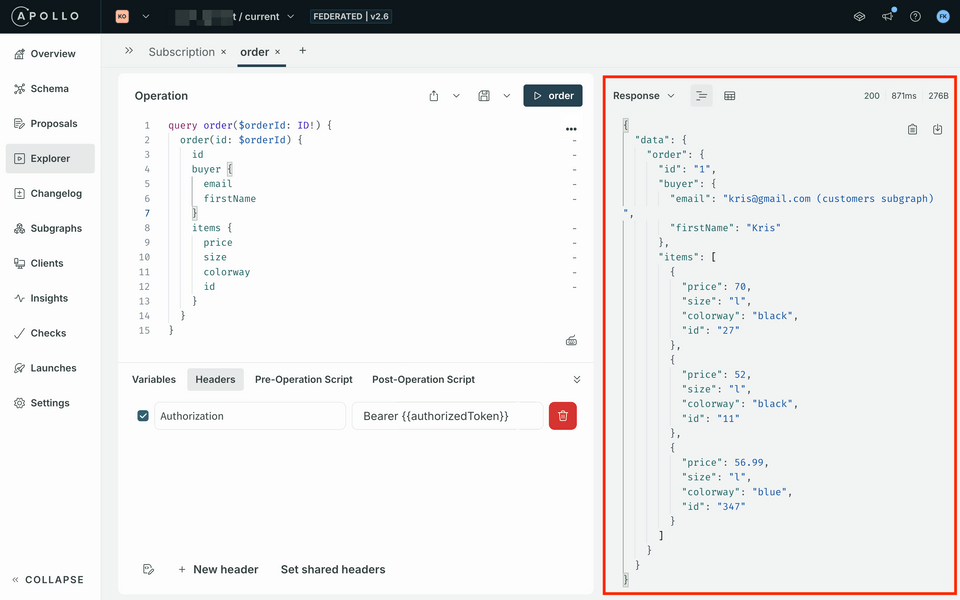
Authorization - scope-based
Directives in focus: @requiresScope
After a JWT request has been validated, we will leverage the scopes within the JWT to determine what the request is authorized to access.
This gives GraphQL an advantage over REST as we can define authorization policies at the individual field level, allowing for flexibility and reusability.
The @requireScopes directive has a parameter called scopes, which takes an array of array of scopes, meaning you can require a different combination of scopes. For example:
requiresScopes(scopes: [["order:items"], ["order:buyer"]]): either"order:item"or"order:buyer"would workrequiresScopes(scopes: [["order:items", "order:buyer"]]): require both scopes to be present
Step 1: Update the schema to use @requiresScopes
Following a least-privileged approach, our scopes will be read-only by default. The table below outlines the two scopes we want to enforce.
| Header | Value |
|---|---|
order:buyer | Read-only access to the purchaser or owner of the order. |
order:items | Read-only access to the items associated with an order. |
Let's add the @requiresScopes directive to enforce scope-based authorization within the router.
Open the
orders-schema.graphqlfile located in the root folder of the repository:https://github.com
Add the
@requiresScopedirective within your imports in the@linkdirective../orders-schema.graphqlextend schema@link(url: "https://specs.apollo.dev/federation/v2.8", import:["@key","@tag","@shareable","@authenticated","@requiresScopes",])Append the
@requiresScopesdirective to theOrdertype'sbuyeranditemsfields../orders-schema.graphqltype Order @key(fields: "id") {"""Each order has a unique id which is separate from the user or items they bought"""id: ID!"""The user who made the purchase"""buyer: User! @requiresScopes(scopes: [["order:buyer"]])"""A list of all the items they purchased. This is the Variants, not the Products so we know exactly whichproduct and which size/color/feature was bought"""items: [ProductVariant!]! @requiresScopes(scopes: [["order:items"]])}Commit your schema changes.
Check your work: Testing the authorization policy
Set up the operation
Let's make a request to retrieve an order's buyer and items.
Create a new tab and copy the operation below:
query order($orderId: ID!) {order(id: $orderId) {idbuyer {emailfirstName}items {pricesizecolorwayid}}}In the Variables panel, copy and paste the following JSON payload:
{ "orderId": "1" }
Testing an unauthorized request
In the Headers panel, set the
Authorizationto an unauthorized token by setting the value toBearer {{unauthorizedToken}}.Bearer {{unauthorizedToken}}We should expect that these values we don't have access to return as
null, despite being a valid JWT.Run the query. You should get errors with
Unauthorized field or typealong with thepathto which fields are restricted:Order.buyerandOrder.items.https://studio.apollographql.com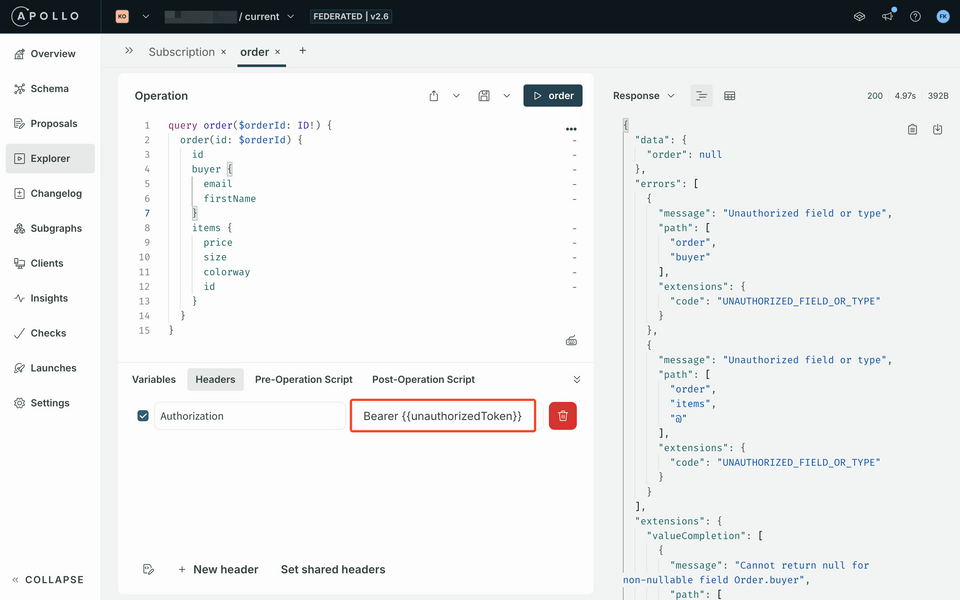
Testing an authorized request
We need to add a new authorization header that will reference a different token: one created by our preflight script. Currently our token does not have the correct scopes to access the data. Let's set our header with a token that does.
Edit the
Authorizationheader you created previously. Set the value toBearer {{authorizedToken}}.Bearer {{authorizedToken}}Send the request again. We should see that data has successfully been returned!
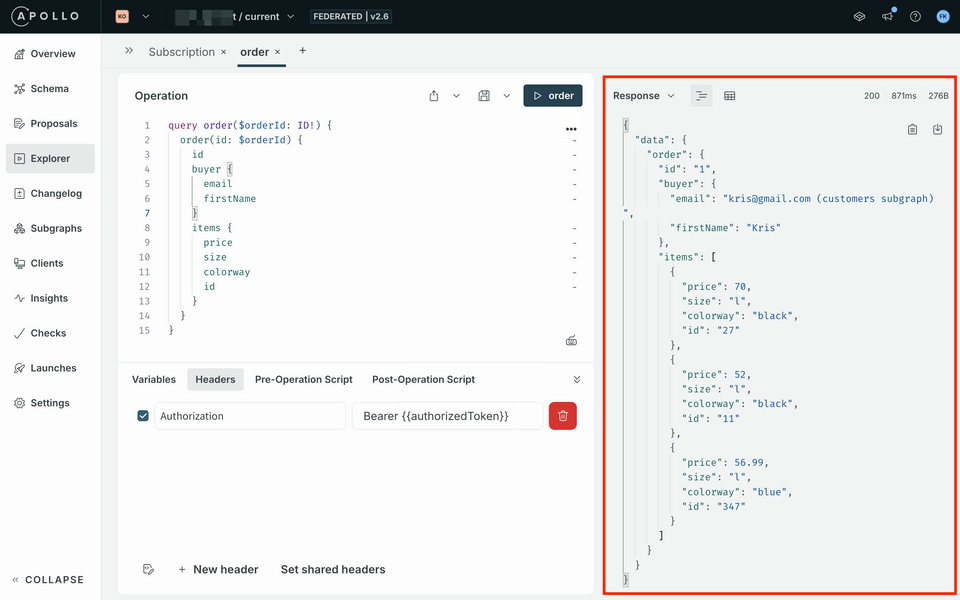
Up next
In this module, we've covered how to support JWT authentication and scope-based authorization through the GraphOS Router.
In the next section, we'll show how we can leverage the power of coprocessors to protect PII data in our graph.
