👋 Welcome to Caching in the router!
We're so glad you've decided to join us. In this course, we'll take a deep dive into the GraphOS Router's caching capabilities. We'll talk about how the router's in-memory cache works, how to set up automatic persisted queries to improve performance, and how to configure a distributed cache that multiple router instances can access.
Let's jump in!
Why caching?
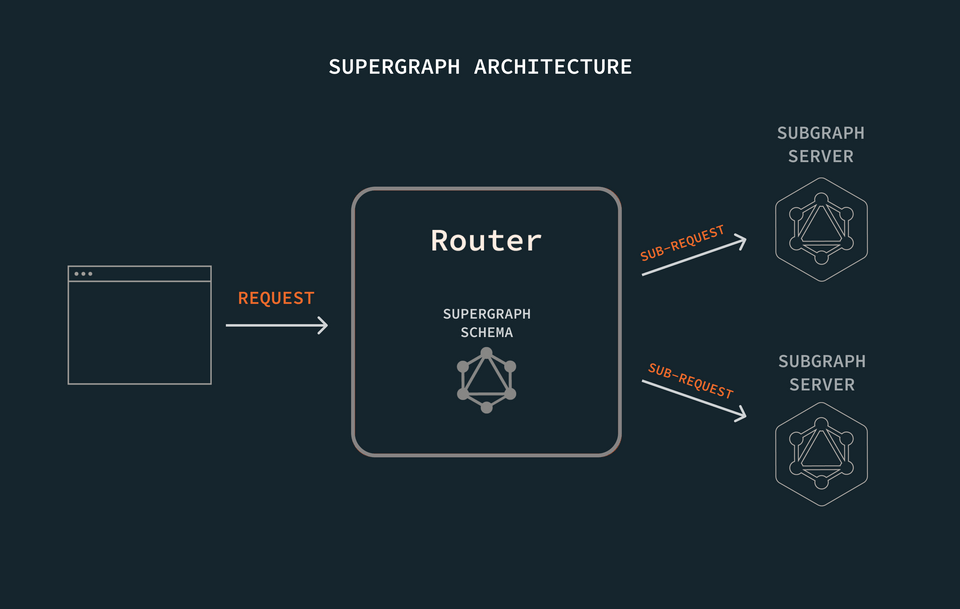
When we build a federated architecture, we're prioritizing performance from the start: a centralized router receives a client request, divides it up by subgraph responsibility, and executes smaller requests to gather all the data that's needed.

Using the supergraph schema, the router already understands how to ask each subgraph server for just the data it's responsible for—and nothing more! This keeps our operations lean, performant, and composable.
Caching makes a good thing even better: we can implement caching throughout our system, from the frontend to the back. But we can also make sure that the piece that ties everything together, the router, can also benefit from our caching strategy.
The GraphOS Router comes equipped out-of-the-box with its own robust in-memory cache. This cache accelerates the router's ability to resolve queries by storing and reusing documents useful to the execution process, such as introspection responses and query plans.
The biggest limitation with the router's in-memory cache is that it's exactly that: in-memory. Enterprise environments with a lot of traffic typically involve multiple router instances running simultaneously, but each router consults its own cache in isolation when looking to save time executing queries.
We can remedy this problem by configuring a distributed cache, one shared by all the router instances. With a distributed cache, each router can have access to information that may have originally been cached by a different router instance.
What we're building
In this course, we'll tinker with the router that powers requests for Airlock, an intergalactic trip booking app. To keep our focus on caching, we'll work with just two of Airlock's many subgraphs: listings and reviews. But you won't need to be familiar with the subgraph code: we'll stay in the router's domain, and let our remotely-hosted subgraphs do their job of returning data when queried.
Sign up for an Apollo account
Don't have an account yet? Create one now and you're all set with the Free plan! Jump to the next step.
If you already have an existing account in an organization on a different plan, you must have Graph Admin or Org Admin role to create graphs and follow along with the course.
Project setup
To follow along with the course, you will need the following:
Prerequisite knowledge
We assume that you are familiar with GraphQL concepts like types, queries, and mutations. Check out our Intro to GraphQL course in the language of your choice if you need a refresher. And to brush up on GraphQL federation, check out our Federation course.
Additionally, familiarity with YAML is a plus—but we'll walk through all the configuration as we write it! Lastly, you'll need a text editor or an IDE (we're using Visual Studio Code).
Create the project directory
No code to clone here: just create a project directory on your computer that we can work in.
We'll start by creating two new (empty) files: router-config.yml and .env.
📂 odyssey-caching-in-router┣ 📄 .env┗ 📄 router-config.yml
.env will hold our graph-specific environment variables. router-config.yml will server as our configuration file for the GraphOS Router that we'll install next.
Install the router
The GraphOS Router is a high-performance graph router, available as an executable binary that you can add to your project with a curl command.
We'll download it now by running the install command in a terminal opened to our project directory.
curl -sSL https://router.apollo.dev/download/nix/latest | sh
Note: Visit the official documentation to explore alternate methods of downloading the Router.
Now when we check the contents of our project directory, we'll see that we have a new binary file called router!
📂 odyssey-caching-in-router┣ 📄 .env┣ 📄 router┗ 📄 router-config.yml
We'll boot up our router in the next lesson. Before we do that, we'll need to make sure we have the Rover CLI running on our computer.
Rover setup
Rover is Apollo's command line interface (CLI) tool that helps developers work with graphs and interact with GraphOS. It's a handy and versatile tool that can be used for both local development and CI/CD. We'll use Rover to publish our subgraph schemas.
Up next
With all of our installations out of the way, it's time to set up our graph!
Share your questions and comments about this lesson
This course is currently in
You'll need a GitHub account to post below. Don't have one? Post in our Odyssey forum instead.
