Overview
Everything starts with creating a graph in GraphOS. This gives us a single source of truth for all of our subgraph schemas, plus it serves as a dashboard for how our supergraph is running as a whole.
In this lesson, we will:
- Create a new graph in Studio
- Store our environment variables
- Publish the subgraph schemas we'll be working with
Create a graph in GraphOS
Check your plan: This course includes features that are only available on the GraphOS Enterprise plan.
Open a new browser window and go to GraphOS Studio.
If you haven't created a graph in Studio before now, you'll be prompted to do so. Otherwise, we can create a new graph by clicking the + Create New Graph button in the upper right corner of the dashboard.
studio.apollographql.com
We'll give our graph a title—we're calling it Airlock, to match our app—keep the default settings for Graph Architecture as "Supergraph", then click Next.
studio.apollographql.com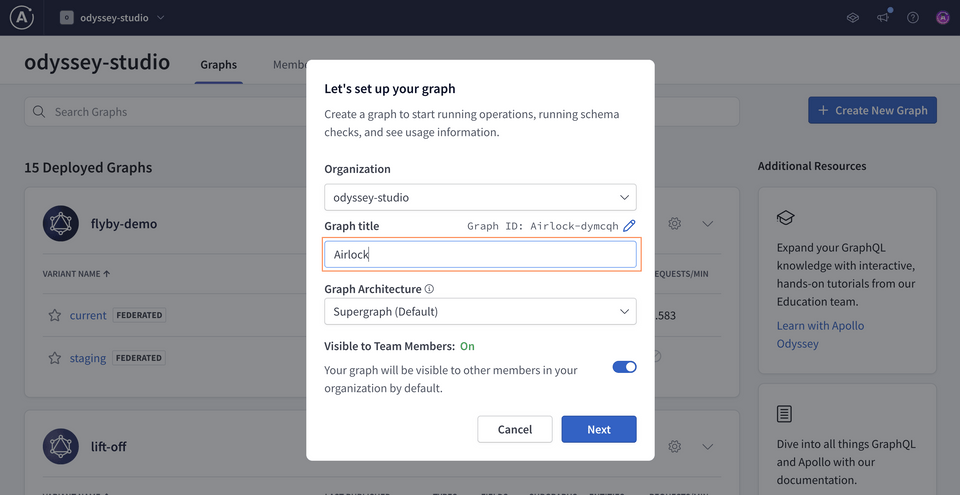
If you don't see the modal above, you may be on the wrong plan.
Check your plan: This course includes features that are only available on the GraphOS Enterprise plan.
We should now see a modal with options for publishing a schema.
studio.apollographql.com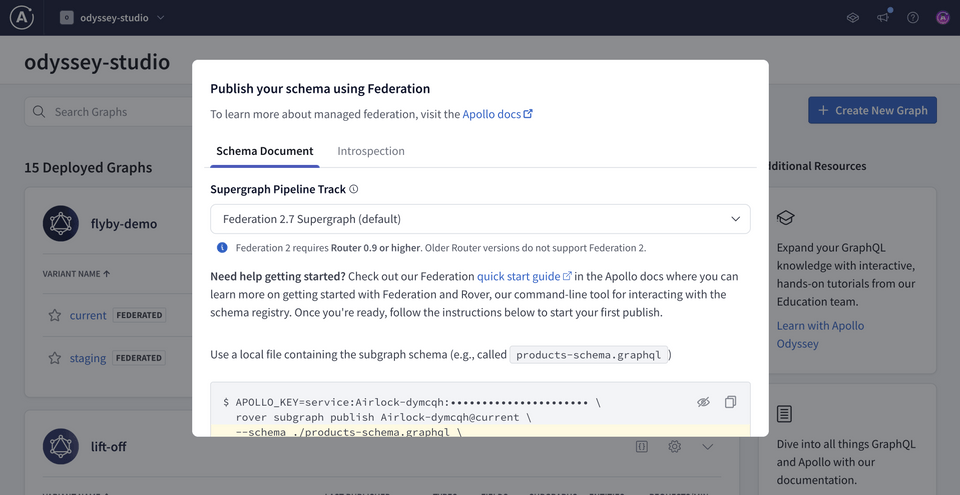
Connecting the router to the graph
To connect our router to our new graph, we'll need two values:
APOLLO_KEY: Your graph's API key, used to interact with a single graph in GraphOS. It starts with something likeservice:your-graph-name.APOLLO_GRAPH_REF: The graph reference (or graph ref) for our supergraph. A graph ref starts with the graph's ID, followed by an@symbol, followed by the graph variant.
We'll use these values every time we run the router, so we'll store them in our project's .env file.
Let's locate both values. Go back to the configuration options in Studio that appeared after you created your supergraph. Make sure you're on the Schema Document tab.
First, make sure that the Supergraph Pipeline Track dropdown is set to Federation 2.7 Supergraph. This specifies that our supergraph should be built using the latest features of Apollo Federation.
studio.apollographql.com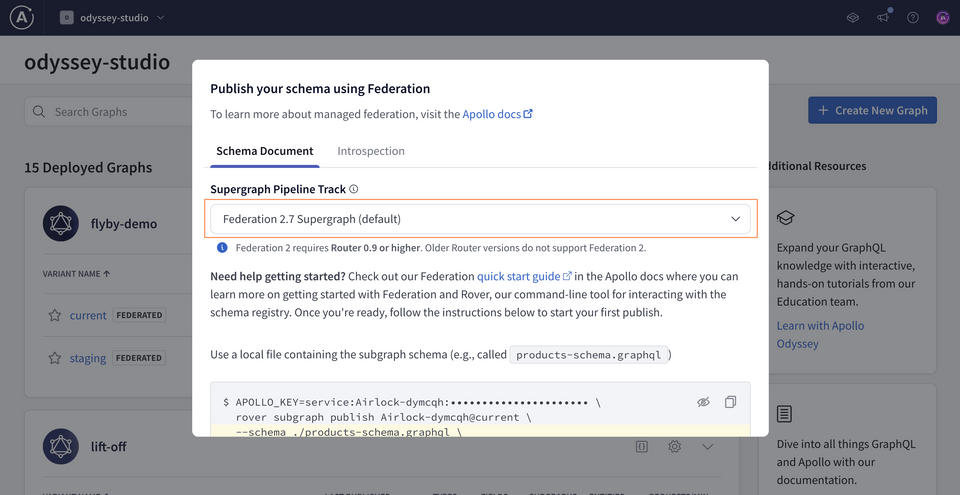
Below, take a little peek at the command for publishing a subgraph schema. This shows how we can use Rover to publish our subgraphs from the command line. We'll run this command momentarily, but for now we can focus on the
APOLLO_KEYvalue included here.APOLLO_KEY=your-graphs-apollo-key \rover subgraph publish your-graph-name@current \--name products --schema ./products-schema.graphql \--routing-url http://products.prod.svc.cluster.local:4001/graphqlClick on the eye icon on the code block to reveal the full value of
APOLLO_KEY. CopyAPOLLO_KEYand its value into your project's.envfile. We'll need it for the next step, and won't have access to the same key again through Studio.studio.apollographql.com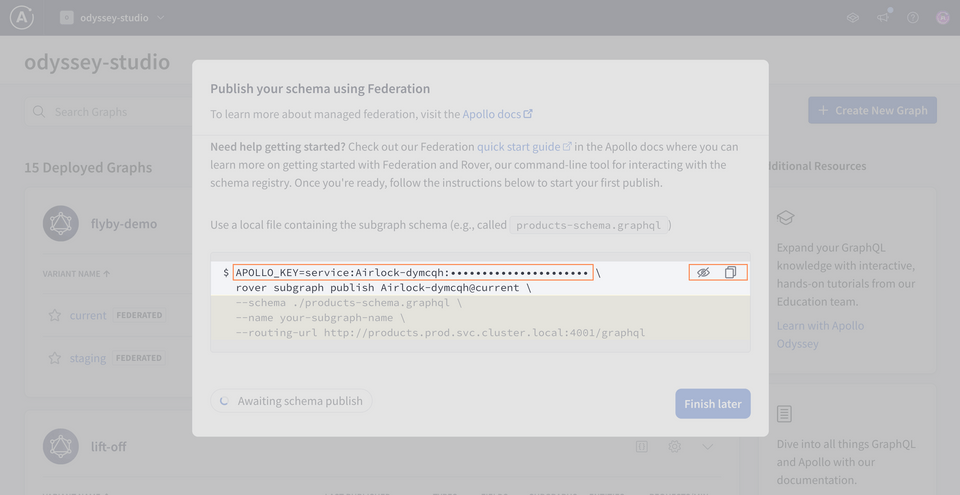 .envAPOLLO_KEY=your-unique-apollo-api-key
Now let's go back to Studio to get our graph ref. The value we're looking for appears in the same code block, directly after the
rover subgraph publishpart of the command. We'll save this value as an environment variable as well, but we can access it anytime from our graph's home page.studio.apollographql.com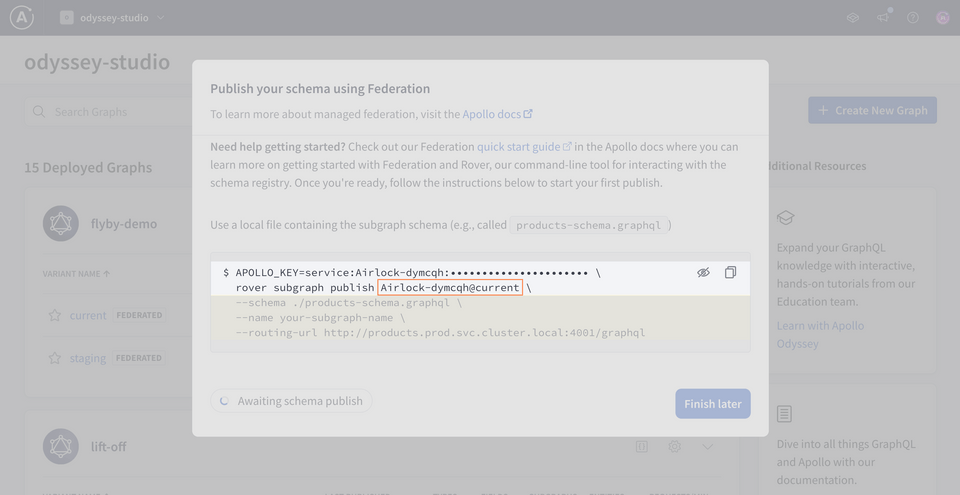 APOLLO_KEY=your-graphs-apollo-key \rover subgraph publish your-graph-name@current \--name products --schema ./products-schema.graphql \--routing-url http://products.prod.svc.cluster.local:4001/graphql
Great! Your .env file should now have both values for APOLLO_KEY and APOLLO_GRAPH_REF.
APOLLO_KEY=your-unique-apollo-api-keyAPOLLO_GRAPH_REF=your-graph-name@current
Publishing the subgraph schemas
Rover has a command ready to help us with this important task: rover subgraph publish. This command pushes the latest version of a single subgraph schema to GraphOS Studio.
Usually, we would provide Rover with the path to our GraphQL schema file. We can also choose to publish the results of a schema that we introspect from a running GraphQL server. This means that we can pull the schemas from our two running services—listings and reviews—and publish each as components of our supergraph.
Here's what the command looks like. First, we call rover subgraph introspect to introspect the schema from the remote service's URL; then we pipe the results into rover subgraph publish.
rover subgraph introspect \<REMOTE ROUTING URL> | \rover subgraph publish <APOLLO_GRAPH_REF> \--name <SUBGRAPH NAME> \--schema <SCHEMA FILE PATH> \--routing-url <REMOTE ROUTING URL>
To use this command for both of our subgraphs, we need to provide the graph ref for the supergraph we want to publish to and the following command line options:
| Option | What is it? |
|---|---|
--name | What we want to call our subgraph in GraphOS |
--schema | We can use the results of the previous command's introspection by giving this option a single dash (-) |
--routing-url | The URL where our subgraph runs (a remote address) |
We'll also need the URL for each of our remote subgraphs running on Heroku. We'll use the routing URL provided for each subgraph in the table below as part of our publish command.
| Subgraph name | Routing URL |
|---|---|
| listings | https://rt-airlock-subgraphs-listings.herokuapp.com/ |
| reviews | https://rt-airlock-subgraphs-reviews.herokuapp.com/ |
Let's fill out this command for our listings subgraph. (Make sure to replace the <APOLLO_GRAPH_REF> value with your own!)
rover subgraph introspect \https://rt-airlock-subgraphs-listings.herokuapp.com/ | \rover subgraph publish <APOLLO_GRAPH_REF> \--schema - \--name listings \--routing-url https://rt-airlock-subgraphs-listings.herokuapp.com/
Note: We've used the \ character in this command to improve legibility by putting each command-line option on its own line. If you choose to type the entire rover subgraph publish command on a single line, you don't need to include the \.
If all is well in the world, running this command should output a message confirming that the subgraph has been published and the supergraph has been updated!
Let's do the same thing for the reviews subgraph, swapping in the corresponding values for the subgraph name, schema file, and routing URL.
rover subgraph introspect \https://rt-airlock-subgraphs-reviews.herokuapp.com/ | \rover subgraph publish <APOLLO_GRAPH_REF> \--schema - \--name reviews \--routing-url https://rt-airlock-subgraphs-reviews.herokuapp.com/
Let's go back to Studio. We can click "See schema changes" in the modal to see what's changed in our supergraph.
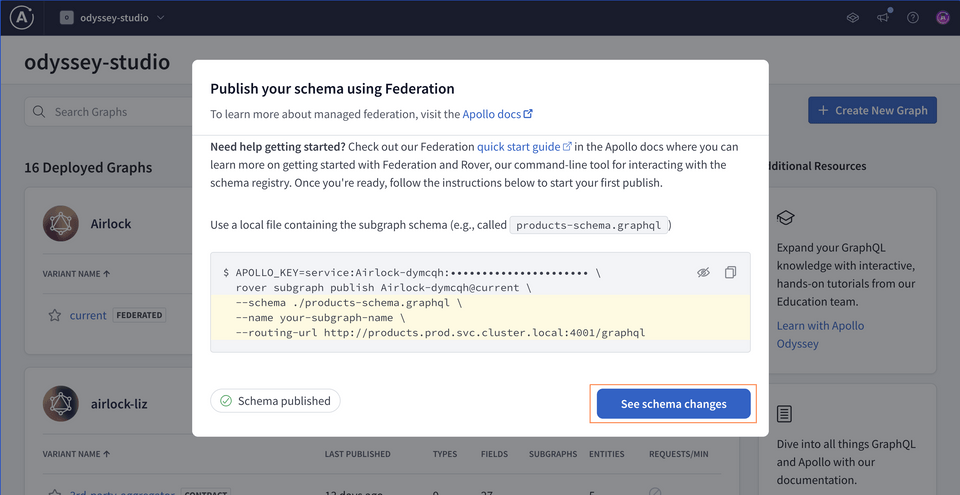
We've done everything we need to with our subgraph schemas. Let's take care of configuring our router next.
Router configuration
We'll start with the router's configuration. Open up router-config.yml in your IDE or code editor, and let's paste the following contents into it.
supergraph:listen: 127.0.0.1:5000include_subgraph_errors:all: truetelemetry:instrumentation:spans:mode: spec_compliant
We've set a few options, including the port that the router should run on (under the supergraph.listen property). We also configured a setting to include all the subgraph errors that bubble up. By default, the router redacts the details of subgraph errors in its responses, and we might see an error message like "Subgraph errors redacted". In production environments, this property is usually set to false, but it'll be helpful if you run into any issues following along in this tutorial.
Lastly, we have some telemetry configuration which reduces the kinds of errors we'll see in our terminal output.
Note: To learn more about other options available for configuring the GraphOS Router, check out the documentation.
Running the router
Next up: we'll tell the router which supergraph to connect to, and how to authenticate to it.
For that, we'll use those two specific pieces of data we copied from the supergraph creation process: our APOLLO_KEY and APOLLO_GRAPH_REF values.
From a terminal in your project directory, run the command below that suits your development environment, replacing the placeholder <APOLLO_KEY> and <APOLLO_GRAPH_REF> with your values from .env.
APOLLO_KEY=<APOLLO_KEY> APOLLO_GRAPH_REF=<APOLLO_GRAPH_REF> ./router --config router-config.yml
$env:APOLLO_KEY="<APOLLO_KEY>"$env:APOLLO_GRAPH_REF="<APOLLO_GRAPH_REF>"./router --config router-config.yml
Notice the --config flag we're including in our command? This tells the router to use the settings we've included in router-config.yml.
We'll see a few lines of router output, and finally a message that our router is running on port 5000, ready to receive queries!
Let's copy this address.
http://127.0.0.1:5000/
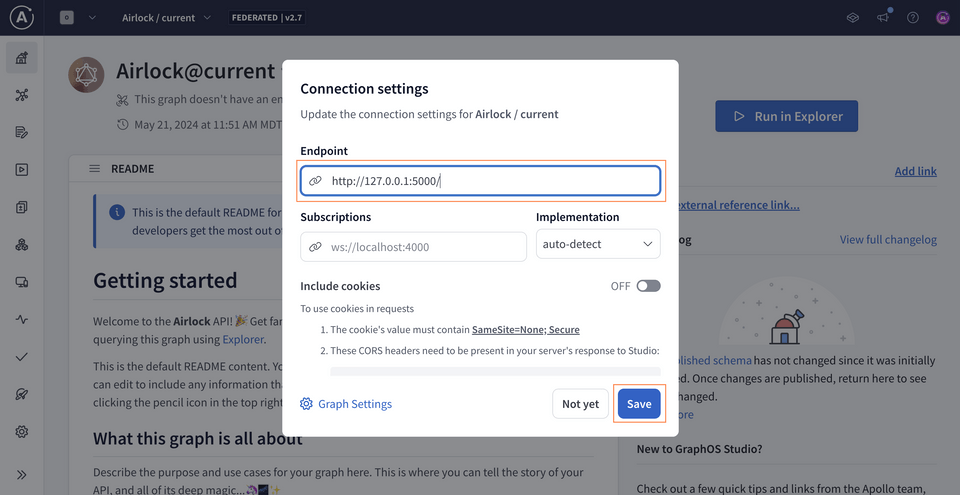
This is the entrance to our graph: if this were a production URL, it's where anyone querying any part of our schema would send their requests to. For this course, we'll keep our router running locally on port 5000—so let's add this detail to GraphOS!
Connecting the router to GraphOS
Flipping back over to Studio, click on the README tab in the sidebar. Next, tap the Connection Settings link at the top of the page.
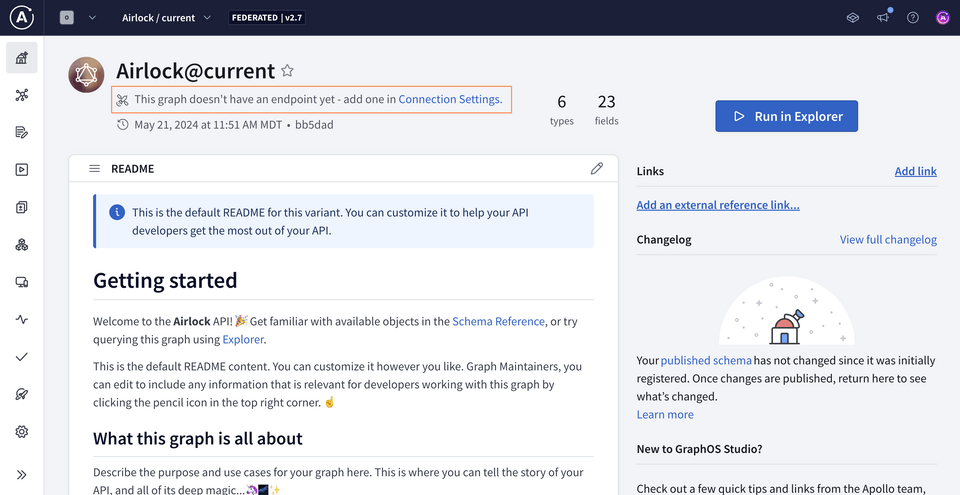
We'll paste the router address we copied (http://127.0.0.1:5000) as the endpoint, then save.
Testing our schema
Let's put together a query that retrieves the titles and descriptions of our featured listings. Select the Explorer tab from the sidebar and paste in the following operation.
query GetFeaturedListings {featuredListings {idtitledescriptionnumOfBeds}}
Now let's run this query, and... fantastic! We've got data!
Key takeaways
- Creating a graph in Studio gives us a single source of truth for our subgraph schemas and supergraph performance.
- We can connect our self-hosted router to our graph in Studio by providing two variables, our
APOLLO_GRAPH_REFand ourAPOLLO_KEY. - The router can be configured by running the start command with the
--config, which accepts a YAML file as its argument. - When connected to our graph in Studio, the router acts as the single point of content to our clients. It receives requests, delegates each part to the subgraph responsible, and returns the data in a single response.
Up next
Our router's equipped to execute some queries! So let's take a closer look at what exactly it caches in the process.
Share your questions and comments about this lesson
This course is currently in
You'll need a GitHub account to post below. Don't have one? Post in our Odyssey forum instead.