Overview
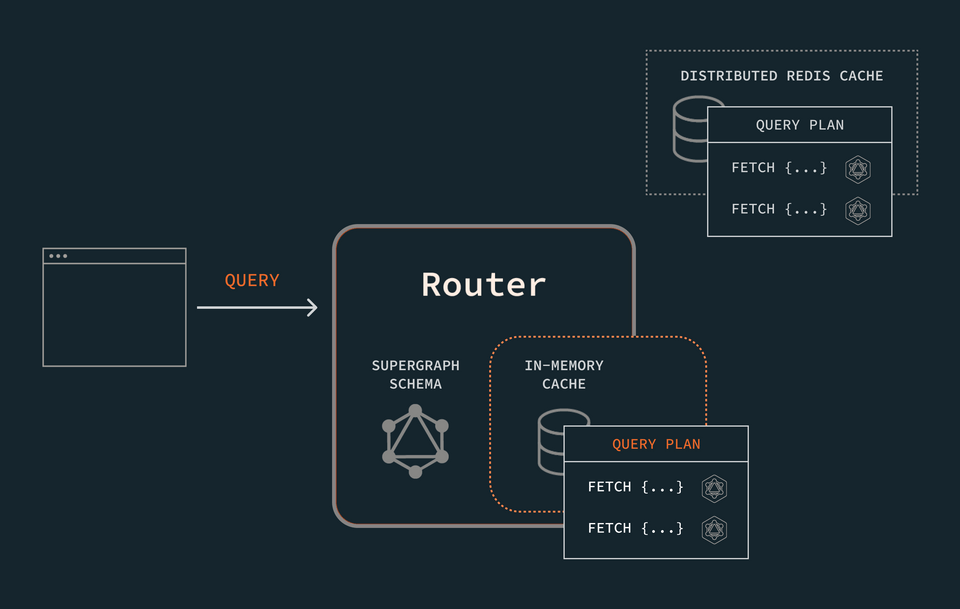
When we run multiple router instances, we are limited by each router's individual in-memory cache. Using a distributed cache overcomes this challenge.
We'll be using Redis as our caching mechanism.
In this lesson, we will:
- Learn how a distributed cache works with query plans
- Configure a Redis database
- Connect the router to Redis
- Store query plans and APQ
Caching query plans with multiple router instances
We'll need to tell the router where to find the distributed cache, but first, let's take a look at how the presence of a distributed cache changes the router's process of creating and storing query plans.
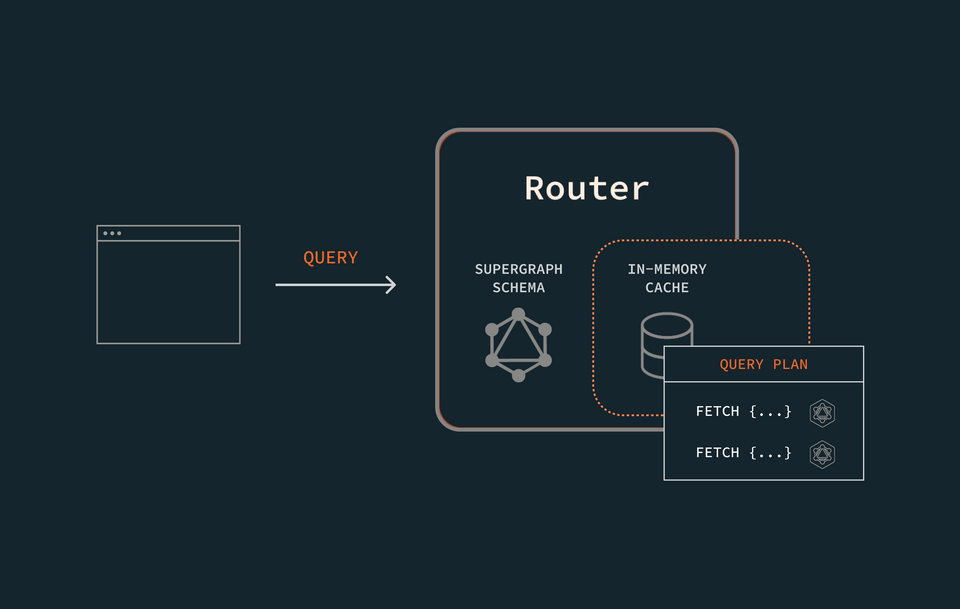
We know that for each query the router executes, the router creates a query plan. Before it generates the query plan, however, the router first consults its own in-memory cache. If it finds the query plan for that operation, great! It plucks it from the cache and follows the instructions to resolve the query.
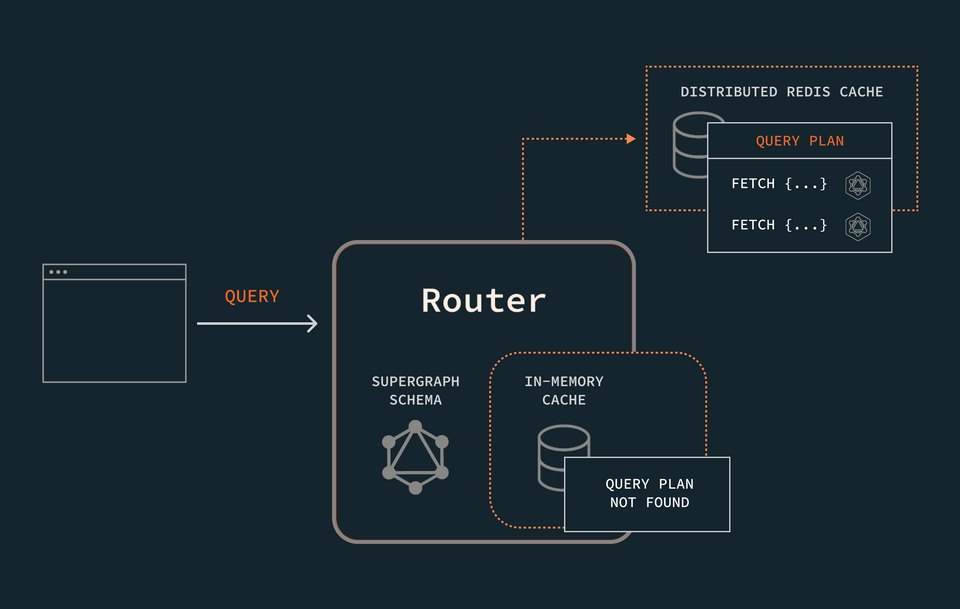
If the query plan is not in the router's in-memory cache, it will go on to check in the distributed cache. If the cache contains the query plan in question, the router uses it to resolve the query—and it stores a copy in its own in-memory cache for next time.
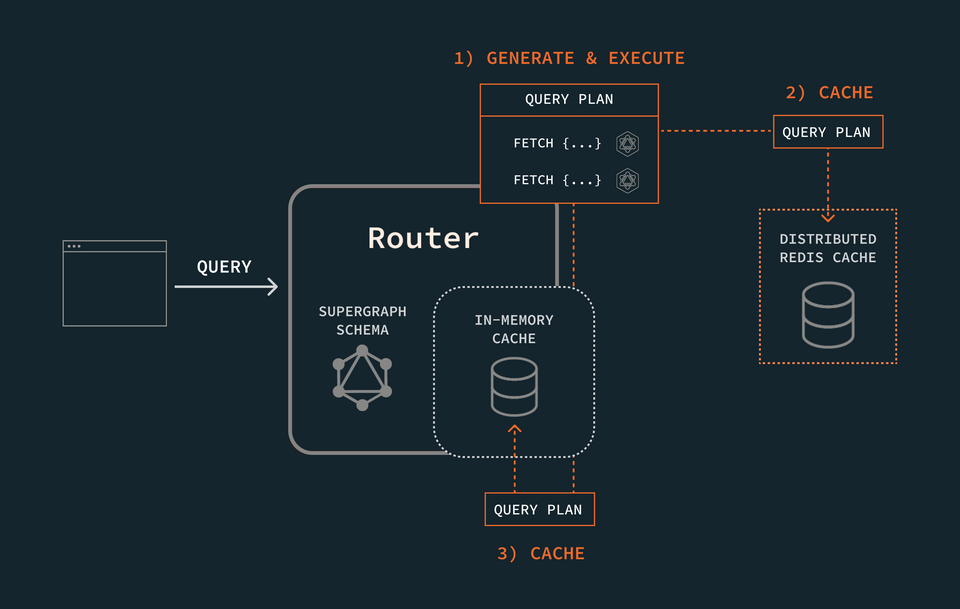
If the query plan can't be found in either cache, the router goes ahead and generates it. Then, to save itself the trouble the next time it gets the query, it stores the resulting query plan in both its local and distributed cache.
Caching with Redis
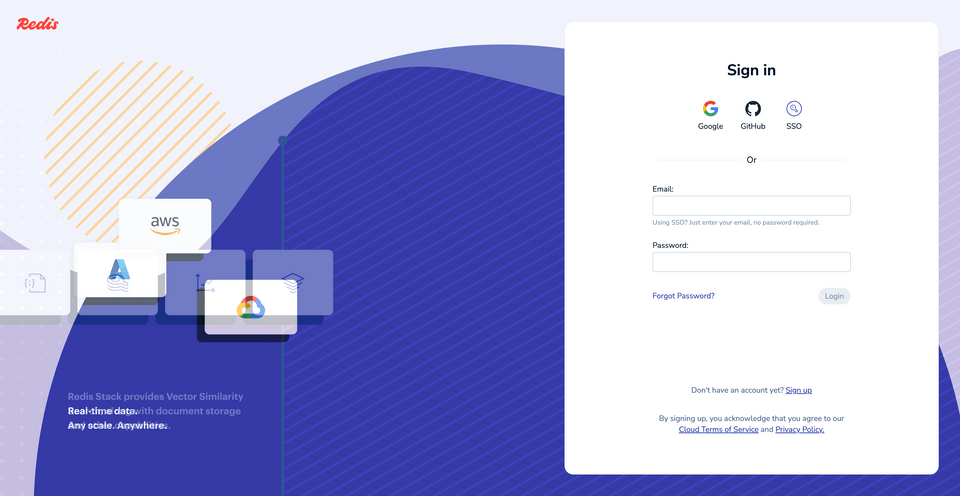
We'll set up a distributed caching layer using Redis, so jump to Redis Cloud to create a free account. This will provision one free database which we can use for our cache. Choose whichever provider and region is closest to you.
To keep an eye on the actual data in our Redis database, we'll be using their official tool, Redis Insight. After creating your account, navigate to the Download Center, available in the menu on the left. Here you'll find a dropdown for Modules, Tools & Integration. Locate the correct version of Redis Insight for your operating system and click Download.
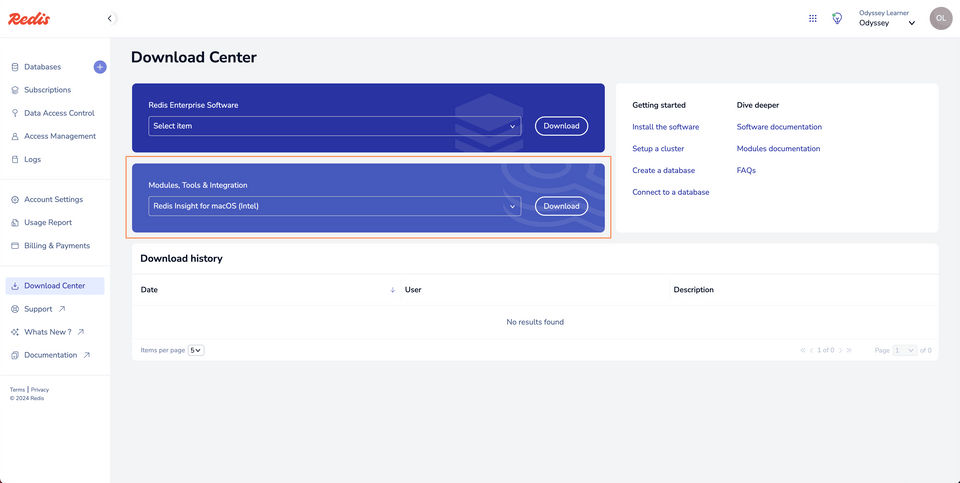
When the download is complete, finish the installation and open up the app.
Connect to Redis Insight
To connect our new database to Redis Insight, we'll first go back to the Databases page. Here we'll see a single row containing all our database details. Under the Endpoint column, click the Connect button. This pops open a modal with a menu item for Redis Insight. Click the Open with Redis Insight button to automatically launch your database connection.
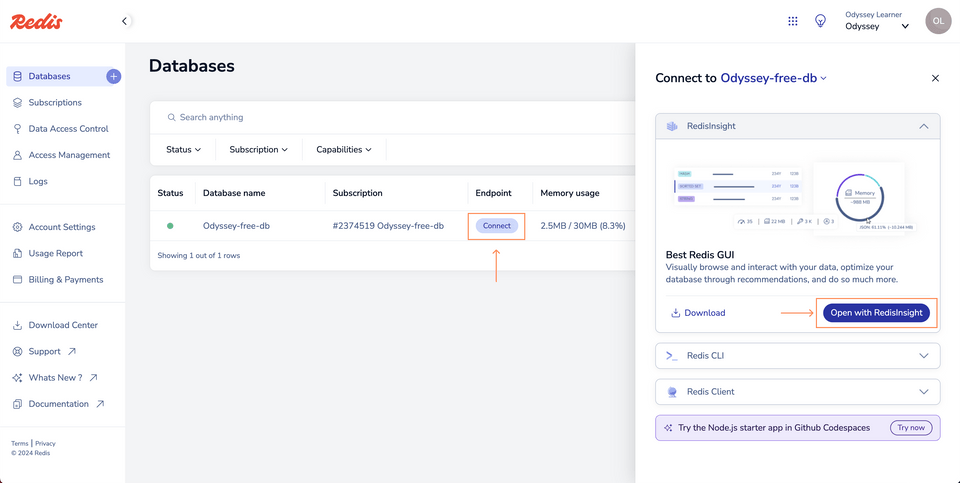
This will prompt you to open up Redis Insight on your computer. Once it's open, we'll see that it has automatically connected to our database! Though... there's nothing here yet.
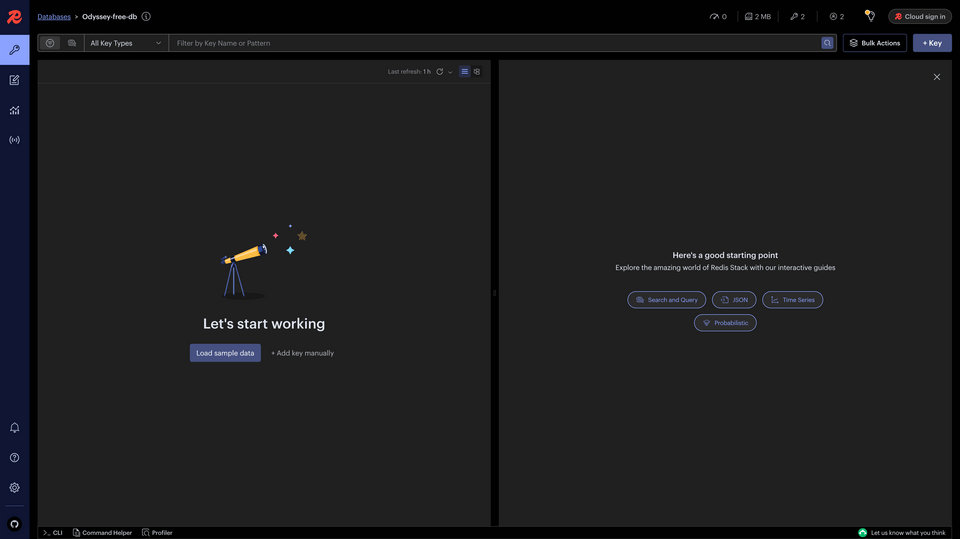
Let's take care of that by connecting our router.
Connecting the router
We'll jump into our project's router-config.yml file to add the necessary configuration for storing the router's generated query plans in our Redis database.
Locate the query_planning key we added under supergraph when configuring our cache's warm-up queries. (If you skipped that part, add the query_planning key now!) On the next level under query_planning, add cache.
supergraph:listen: 127.0.0.1:5000query_planning:cache:warmed_up_queries: 100
We'll use the keys under the cache key to define how the router can connect to our distributed Redis cache. We'll add a key called redis, along with three keys nested beneath it: urls, timeout, and required_to_start. Let's walk through these one-by-one.
supergraph:listen: 127.0.0.1:5000query_planning:cache:redis:urls:timeout:required_to_start:
urls
As the value of the urls key, we can pass a list of URLs for all the Redis instances in a given cluster. We have just one Redis node, so we'll define a pair of brackets that can contain our URL.
For a single node, our URL needs to fit the following format.
redis|rediss :// [[username:]password@] host [:port][/database]
Broken down, this means:
- Our URL will start with either
redisorrediss, followed by:// - It should contain both a
usernameand apasswordfor accessing the node - It should define the
host, along with theport(or path to the database)
Note: Your Redis URL may need to be configured specific to your style of deployment. Check out the official router distributed caching docs for more information.
Let's jump back to our Redis database overview in the browser. Click the Connect button again in the Endpoint column to open the connection modal. This time, we'll scroll down to the Redis CLI option. Expanding this section gives us the URL that we need—complete with username, password, host, and port!
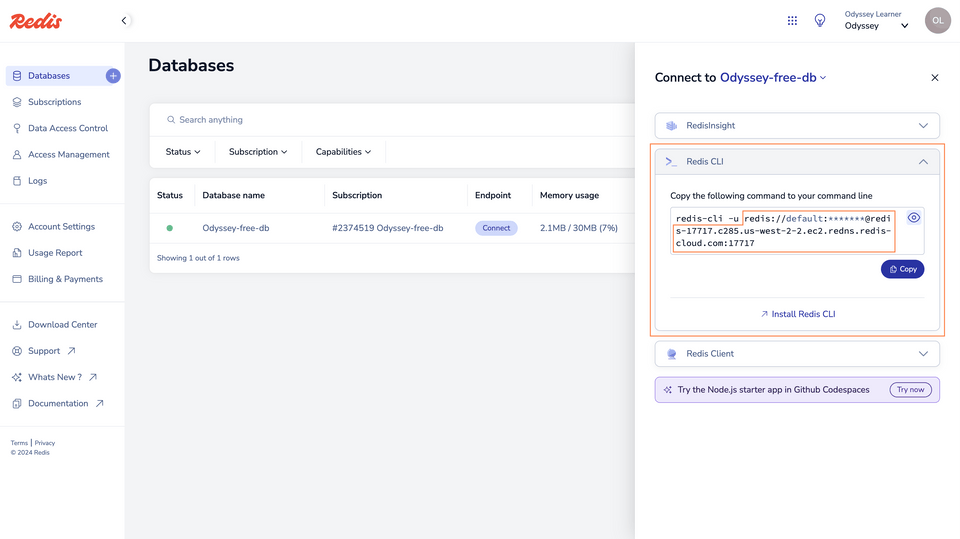
redis-cli -uredis://<USERNAME>:<PASSWORD>@redis-17717.c285.us-west-2-2.ec2.redns.redis-cloud.com:<PORT>
Copy the entire URL (everything after redis-cli -u) and let's jump back over to router-config.yml. Paste it as the value of the urls key, inside of square brackets.
redis:urls:[redis://<USERNAME>:<PASSWORD>@redis-17717.c285.us-west-2-2.ec2.redns.redis-cloud.com:<PORT>,]
Note: In an production environment, use environment variables in place of the hardcoded username and password we've included here. These values should never be committed directly to version control.
timeout
Next, we'll give our router a generous timeout period of 2s. This will give more than enough time for the router to make contact with Redis and establish a connection. Note that by default, this value is set to 2ms. If left as-is, you might see timeout errors in the console when connecting to Redis.
redis:urls: [redis://...]timeout: 2s
This timeout of two seconds will be applied whenever the router attempts to connect to Redis or send commands.
required_to_start
Lastly, we'll set our required_to_start key to true. This will keep our router from booting up unless it's able to talk to Redis; we probably won't want this behavior in production, but for demo purposes it'll help us verify when our Redis connection is successful.
redis:urls: [redis://...]timeout: 2srequired_to_start: true
Starting the router
Let's boot up our router and connect it to our Redis cache layer!
In the router directory, run the following command, substituting in your APOLLO_KEY and APOLLO_GRAPH_REF values.
APOLLO_KEY=<APOLLO_KEY> \APOLLO_GRAPH_REF=<APOLLO_GRAPH_REF> \./router --config router-config.yml
$env:APOLLO_KEY="<APOLLO_KEY>"$env:APOLLO_GRAPH_REF="<APOLLO_GRAPH_REF>"./router --config router-config.yml
When we run the command, we should see a bunch of output in our terminal, including the following lines:
INFO Redis client reconnected.INFO Health check exposed at http://127.0.0.1:8088/healthINFO GraphQL endpoint exposed at http://127.0.0.1:5000/ 🚀
With that, we know our router has successfully connected to Redis!
Running queries
Let's try out this new flow with Redis. Make sure your router is running, then open up Explorer alongside Redis Insight.
Let's try out a basic query for featured listings and their reviews. Build the query by selecting fields from the Documentation panel in Explorer, or copy the operation below.
query GetFeaturedListingsAndReviews {featuredListings {idtitledescriptionnumOfBedsreviews {idtext}}}
Run the query—we should see some data populate in the Response tab—then jump back over to Redis Insight.
If your cache is still empty, click the Refresh button indicated in the screenshot below.
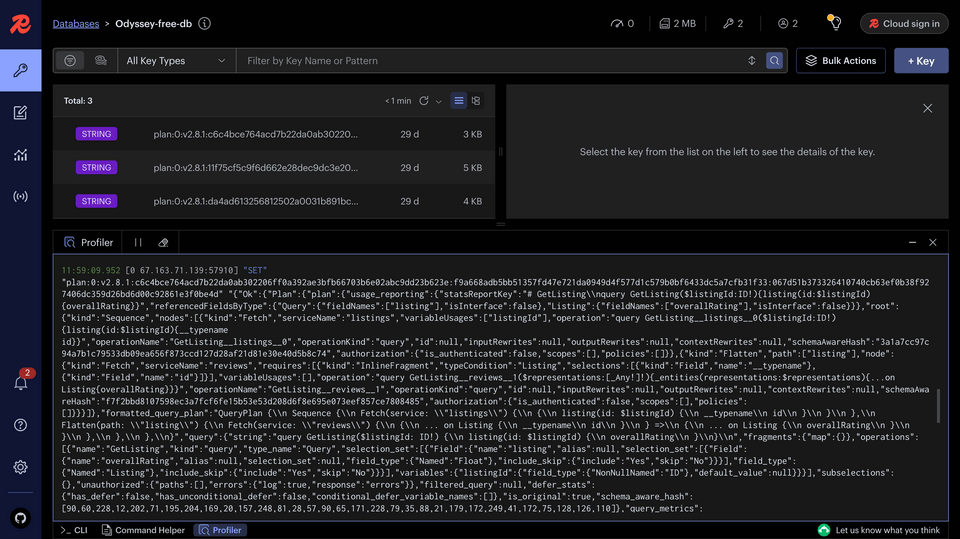
We should see a new entry: a long string with the prefix plan:. Our query plan was stored!
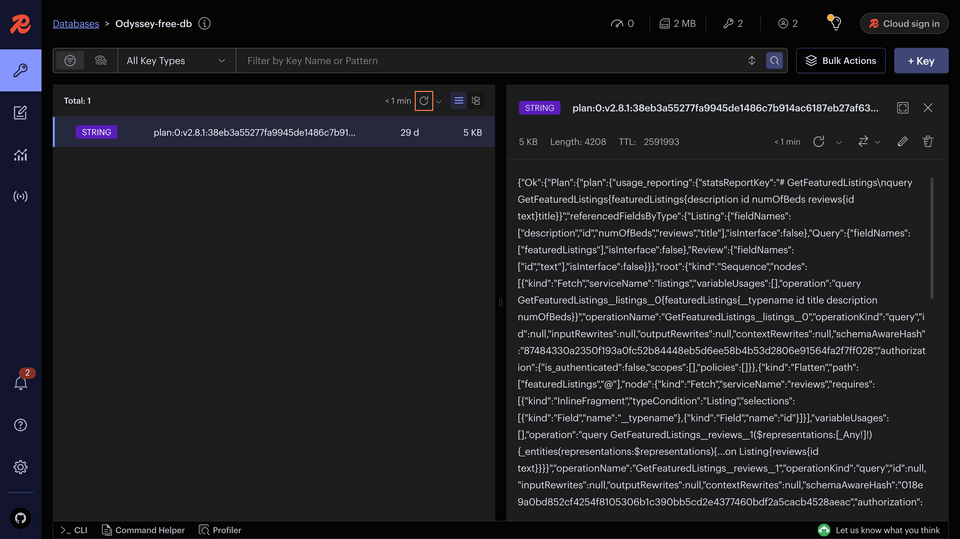
This cache makes it possible for multiple router instances to access the same query plan. Only a single router instance needs to generate the query plan and send it to Redis—the remaining router instances benefit by using the cached plan to resolve queries more quickly.
The Profiler tool
We'd probably like some confirmation when items are stored in and accessed from our cache. So how do we get an idea of what's happening under the hood in our Redis database? Sounds like a job for Redis' Profiler tool!
You can find the button to launch Profiler at the bottom of the Redis Insight interface.
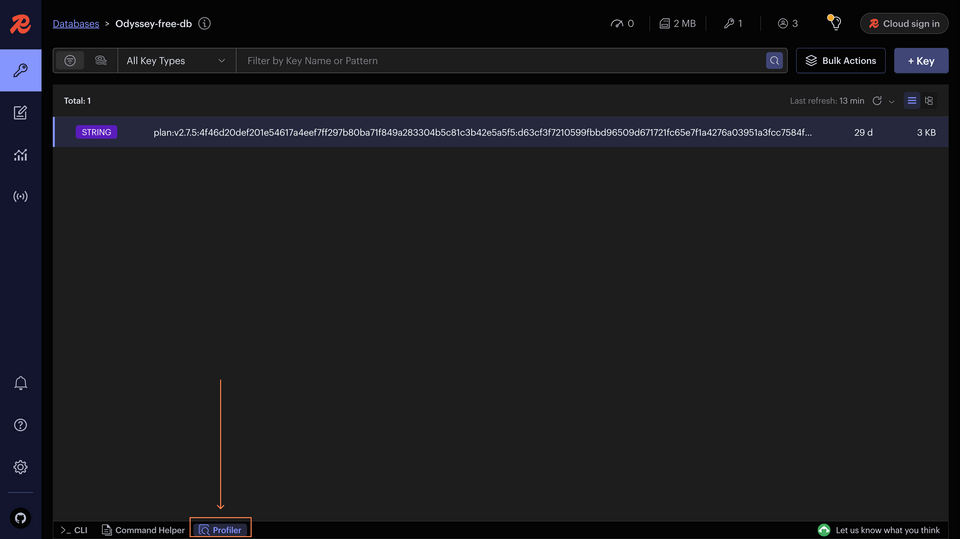
Clicking it pops open a new window; we can start Profiler by clicking the play button.
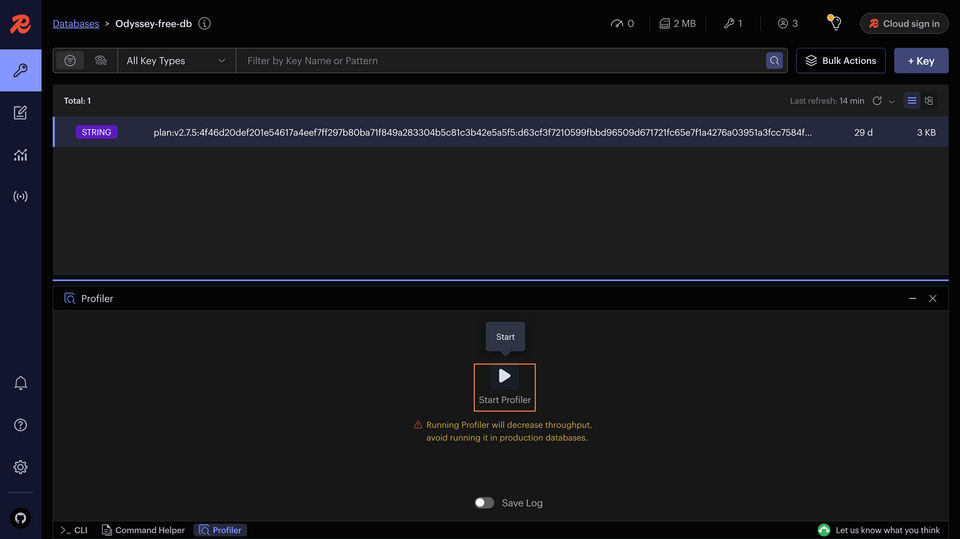
Let's run a different query to see it inserted into the cache.
Copy the operation below, paste it into the Explorer, and run it.
query GetListing($listingId: ID!) {listing(id: $listingId) {titledescriptionidreviews {idtext}}}
And in the Variables panel:
{"listingId": "listing-2"}
After running the query, take a look at the logs in Redis Insight.
We should find a timestamp labeled with "SET". It's followed by the very long string that was inserted into the cache: the query plan from the router.
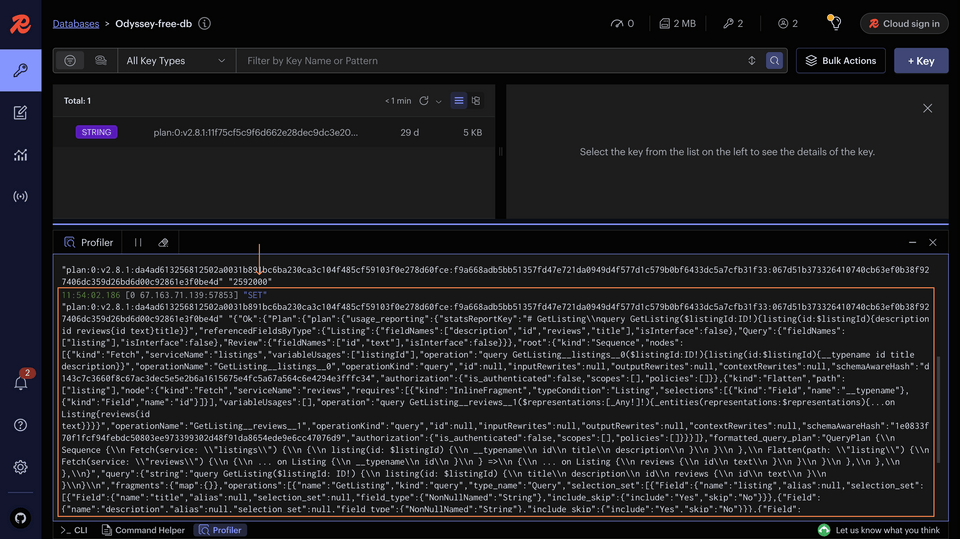
Let's execute the query again to see what happens in our cache. Back in Explorer, hit the play button again. Even after the query is sent, we won't see any new access logs from the Profiler. Remember why?
Our router actually didn't need to check Redis for the query plan it stored: it found the plan in its own in-memory cache first! The distributed cache is there to provide the query plan only if the router can't access it in its own built-in cache.
If we were running multiple router instances, we could see how a query plan generated and stored by one router instance could be accessed from Redis by another router instance. For the purposes of the tutorial, we'll stop and restart our router to achieve the same effect.
Accessing query plans from Redis
Let's make sure the router can actually access a query plan from Redis when it needs it. To do this, we can stop the router, then boot it up again to start with a fresh cache.
APOLLO_KEY=<APOLLO_KEY> \APOLLO_GRAPH_REF=<APOLLO_GRAPH_REF> \./router --config router-config.yml \--log trace
We'll send the router the same operation as before; its query plan is already in the Redis cache. Here's how it will work.
- When it receives the operation, the router will check its in-memory cache for the query plan.
- When it doesn't find it in local memory, it will check Redis.
- Finding it in Redis, the router will use retrieve the query plan and then store it in local memory.
- If we run the query again, the router will be able to locate the query plan in its in-memory cache, rather than going all the way to Redis.
The query plan for the following query should already be in our Redis cache, so let's run it again and observe what happens. (Make sure Redis Profiler is still running!)
query GetListing($listingId: ID!) {listing(id: $listingId) {titledescriptionidreviews {idtext}}}
And in the Variables panel:
{"listingId": "listing-2"}
In the Profiler tool, we'll see output for a GET operation.
11:38:50.940 [0 104.28.192.158:27568] "GET" "plan:0:v2.8.1:###"
This is followed by an additional log marked with EXPIRE. Because the router accessed a particular cache entry, Redis updates it with a refreshed time-to-live, or expiration time. The router found its query plan! At the same time, the router will have stored this query plan in its local cache. If we run the query again, we'll see that the router's able to find it on its own without our distributed cache stepping in to help.
Try another query in Explorer. This one's new, so the router won't find the query plan in either cache.
query GetListing($listingId: ID!) {listing(id: $listingId) {overallRating}}
This time, we'll check out the router's terminal first. After running the query, we can scroll up through the logs. We'll find one that looks something like the snippet below.
TRACE inserting into redis: "plan:0:v2.8.1:####
After inserting the plan into Redis, we'll see another log indicating that the router proceeds with executing the request. That's our first operation taken care of: its query plan is stored in the router's in-memory cache and Redis. We can validate that by checking the Profiler in Redis.
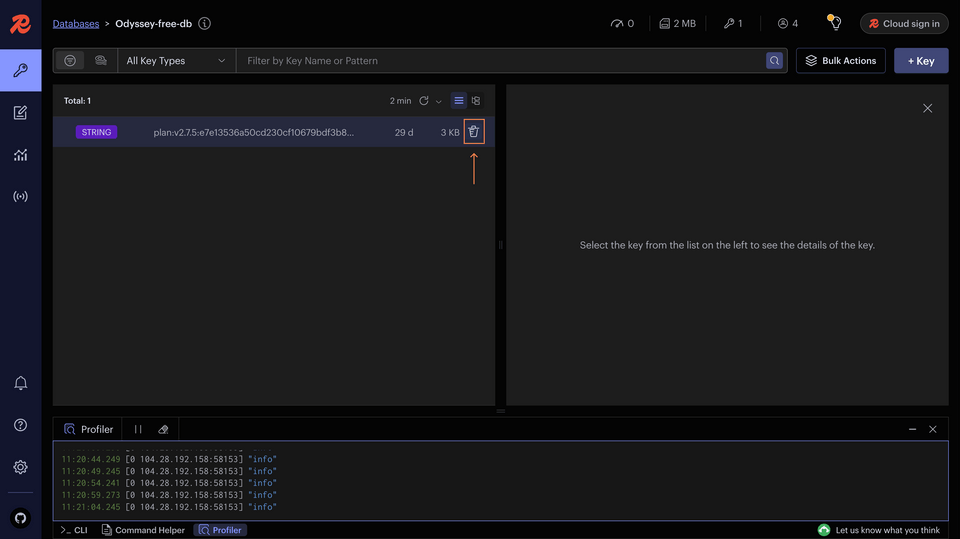
Let's clear out our Redis cache to start fresh. You can delete entries in Redis by hovering over them and clicking the little trash can icon that appears.
Bonus: Caching APQ
Remember automatic persisted queries from the last lesson? Let's get them into Redis too.
Back in router-config.yml, we'll jump back to where we originally configured our apq key. On the same level as the subgraph key, nested just below apq, we'll define a new entry called router.
apq:subgraph:all:enabled: falsesubgraphs:listings:enabled: truerouter:
Note: Make sure you get the indentation right! The router key should appear at the same level of identation as subgraph.
Here, we'll apply a few of the same keys as we did with our first Redis integration. We'll define three keys, each nested in the one preceding it: cache, redis, and urls.
apq:subgraph:# ...subgraph configurationrouter:cache:redis:urls:
As the value of urls, we'll provide (in brackets) the same Redis URL as before. (If you have a separate Redis database you'd like to use, feel free to provide its URL here instead.)
router:cache:redis:urls: [redis://...]
You know the drill! Restart the router, and let's get querying.
Let's run that curl command from the last lesson.
curl --get http://127.0.0.1:5000 \--header 'content-type: application/json' \--data-urlencode 'query={featuredListings{description id title}}' \--data-urlencode 'extensions={"persistedQuery":{"version":1,"sha256Hash":"91c070d387e026c84301ba5d7b500a5647e24de65e9dd9d28f4bebd96cb9c11c"}}'
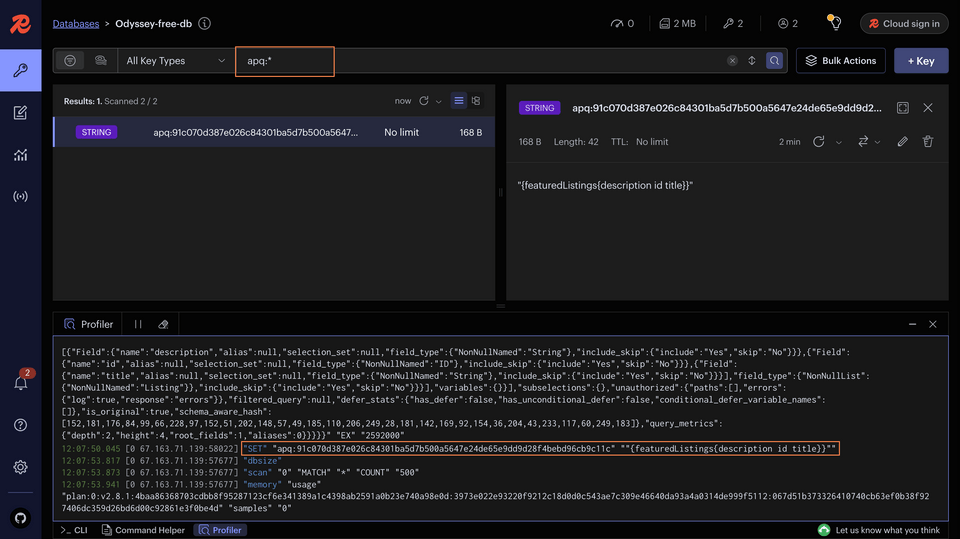
After running the query, check Redis. At the top of the database we should see the option to Filter by Key Name or Pattern. The router stores its APQ with the preface apq: so we can provide the following pattern to the search bar to discover all of our stored automatic persisted queries. Then hit enter!
apq:*
Depending on the number of queries you've run since adding the APQ configuration, you should be seeing at least one entry in Redis. This APQ is ready to help out any router instance that needs it!
Practice
Key takeaways
- The router has the ability to use Redis as a distributed cache, storing query plans and APQ.
- We can customize our router's connection to Redis by providing the
urls,timeout, andrequired_to_startoptions. - When generating new query plans or APQ, the router stores the result in Redis as well as its own in-memory cache.
- Additional router instances that cannot locate something in their cache can then consult Redis to see if another router has stored the data.
- The Redis Profiler tool lets us look under the hood when something is read from or written to the cache.
Up next
The router exposes a lot of metrics, but we need a better way to make sense of them. In the next lesson, we'll set up Prometheus.
Share your questions and comments about this lesson
This course is currently in
You'll need a GitHub account to post below. Don't have one? Post in our Odyssey forum instead.