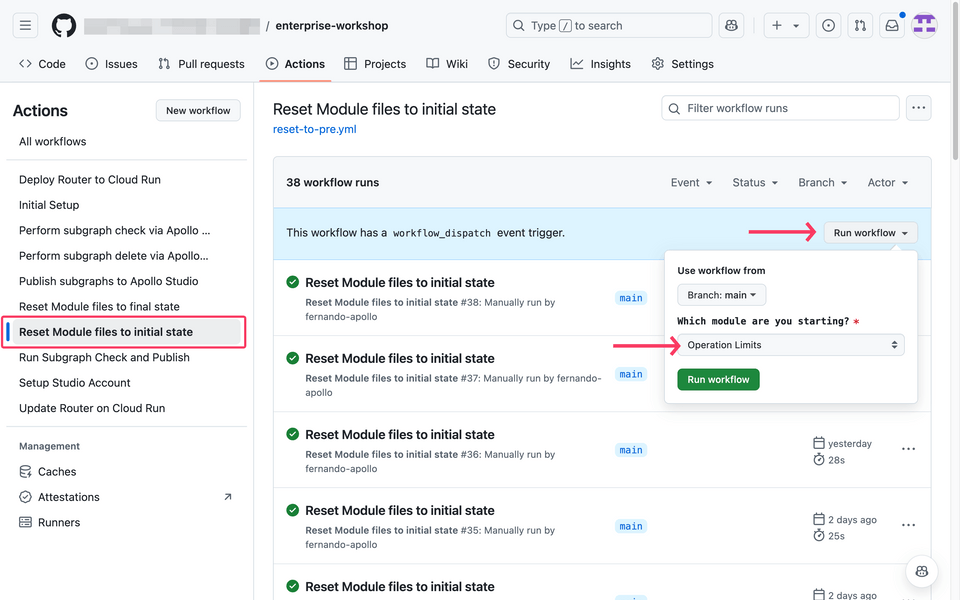
Overview
In this section, we'll cover how to add the Orders REST API to our Supergraph without using a subgraph.
Prerequisites
- Our supergraph running in the cloud
Apollo Connectors for REST APIs
Connectors are a new declarative programming model for GraphQL, allowing you to plug your existing REST services directly into your graph. Once integrated, client developers gain all the benefits of GraphQL, and API owners gain all the benefits of GraphOS, including incorporation into a supergraph for a comprehensive, unified view of your organization's data and services.
For more information, refer to the Apollo Connectors documentation.
Apollo Connectors: KBT Threads and the Orders API
Because our Orders API is a REST-based service, is it a great candidate for Apollo Connectors, but it's always best to check whether an API is a good fit or not.
Using Apollo Connectors with the Orders API
Let's revisit the Orders schema once again. If you need to reset it, you can copy the schema from the code below (comments have been removed for brevity). We have also intentionally left the Authentication and Authorization directives in place.
extend schema@link(url: "https://specs.apollo.dev/federation/v2.8", import:["@key","@tag","@shareable""@authenticated","@requiresScopes",])type Query {order(id: ID!): Order @authenticated}type Order @key(fields: "id") {id: ID!buyer: User! @requiresScopes(scopes: [["order:buyer"]])items: [ProductVariant!]! @requiresScopes(scopes: [["order:items"]])}type User @key(fields: "id") {id: ID!}type ProductVariant @key(fields: "id", resolvable: false) {id: ID!}
Using the Proposals editor to change the Orders schema
The latest release of the Proposals editor composes your supergraph in real-time as you make changes to your schema, making it ideal for developing in a safe environment. For this lab, we will use this editor to make changes to the orders.graphql file, which will then be committed to the repository.
Note: if you don't want to use the Proposals editor, you can make changes directly in the Github editor.
1. ✏️ Create a new proposal
Start by creating a new proposal and give it a name, such as "Connect the Orders REST API to the supergraph":
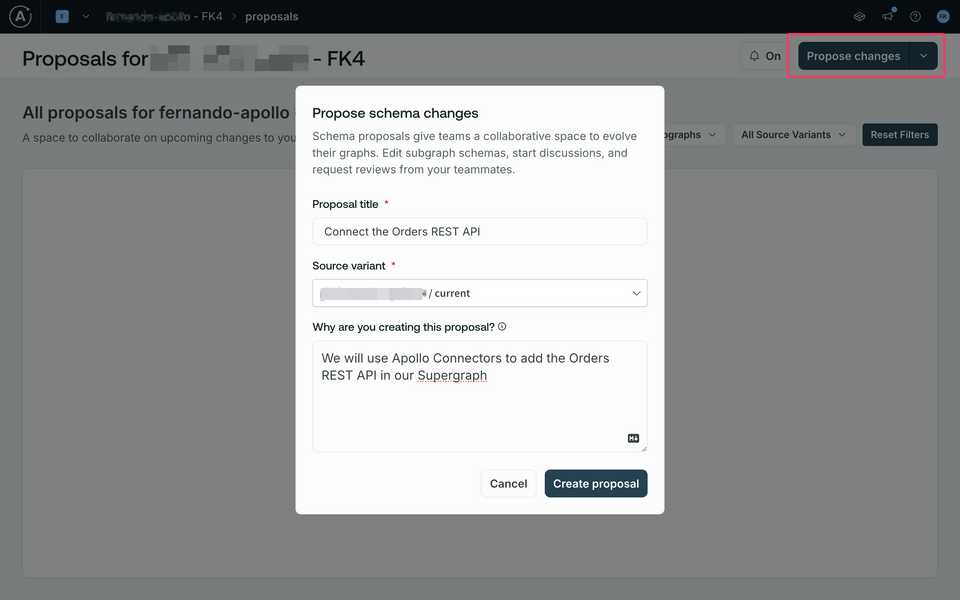
Then, choose the current variant that was created for your account. You can optionally enter a description. Finally click on the Create Proposal button.
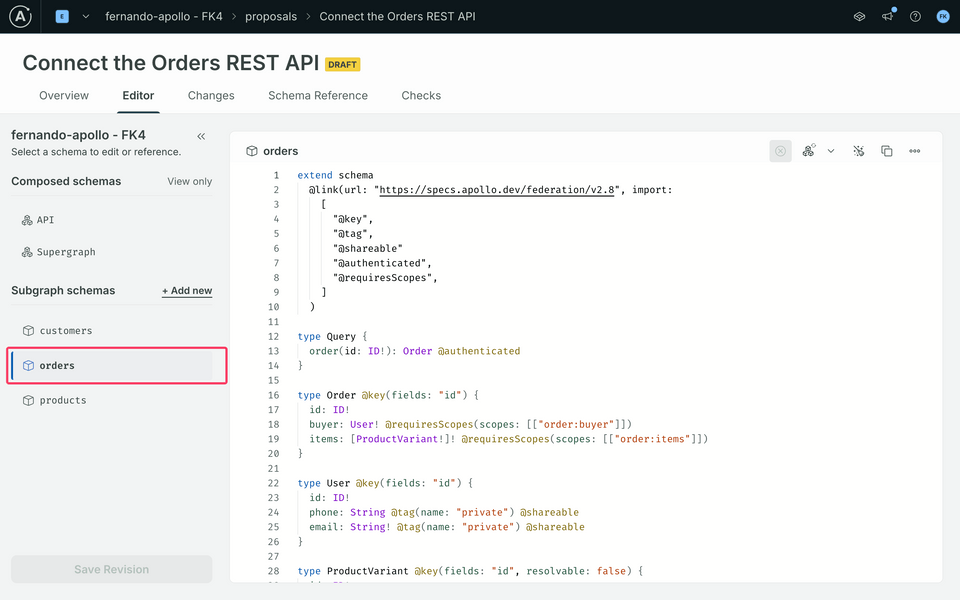
Once the Proposal editor is open, select the orders on the right-hand side to get started:
2. ✏️ Make sure "Compose on Change" is enabled in the editor
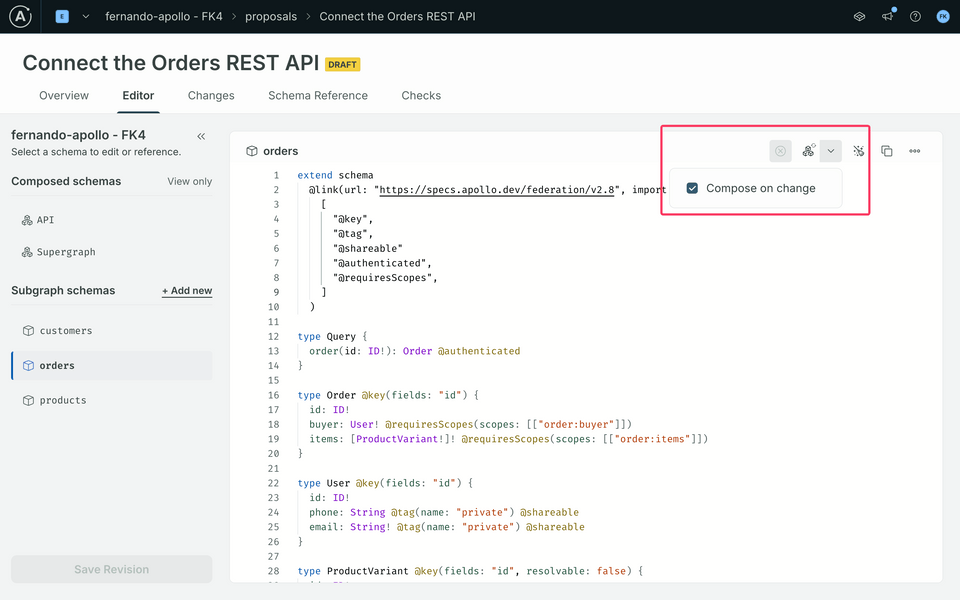
This feature allows you to see how your changes will affect the supergraph, and avoid any potential issues. To enable this feature, simply check the "Compose on Change" box in the editor toolbar, as shown below:
3. ✏️ Federation version and directives for Apollo Connectors
With the editor open, let's start by changing the Federation version - which is currently set to 2.8 - to 2.10. This will allow us to use the latest features of Apollo Federation. Update the @link directive as follows:
-@link(url: "https://specs.apollo.dev/federation/v2.8", import:+@link(url: "https://specs.apollo.dev/federation/v2.10", import:
Next, in order to be able to make use of the Apollo Connector directives, we need to import them using a new @link directive. Add the following highlighted code directly below the first @link directive, as shown below:
extend schema@link(url: "https://specs.apollo.dev/federation/v2.10"import: ["@key", "@tag", "@shareable", "@authenticated", "@requiresScopes"])@link(url: "https://specs.apollo.dev/connect/v0.1"import: ["@connect", "@source"])
Heads up! As soon as you add the new @link directive, the editor will automatically start to compose the supergraph, and this will result in a lot of errors! Don't worry though, we will fix them in the next steps.
As you can see from the directive above, we can now make use of the @connect and @source directives. These directives are used to define the connection between the schema and the REST API. Check the Apollo Connectors documentation for more information on these directives.
4. Add the @source directive to the schema
The Apollo Connector directives allow us to define the connection between the schema and the REST API. The @source directive is used to define the REST API endpoint that the schema will connect to - so let's make use of it.
Add the @source directive directly below our last @link directive as shown below:
# ...@link(url: "https://specs.apollo.dev/connect/v0.1"import: ["@connect", "@source"])@source(name: "api"http: { baseURL: "https://rest-api-j3nprurqka-uc.a.run.app/api" })
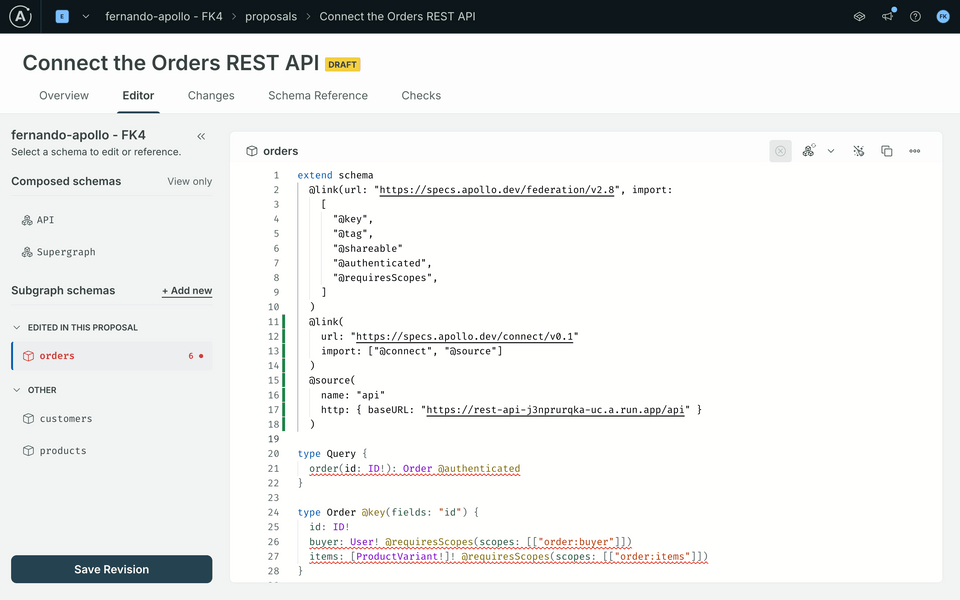
If you'd like to check the REST API endpoint, you can use the following URL: https://rest-api-j3nprurqka-uc.a.run.app/api/orders/1. Opening this URL in your browser should return a JSON response with the order details:
{"id": 1,"customerId": 10,"variantIds": ["27", "11", "347"]}
Now that we have a source API defined and we know the result of invoking our REST API, we are ready to start mapping our schema to the REST API.
5. Add the @connect directive to the schema
We will add the @connect directive right after the @authenticated directive in our order(id: ID!) operation. Note that as soon as you type @conn the editor will suggest to autocomplete it for you - just press Enter to accept the suggestion. You can also press Ctrl + Space to see the available suggestions.
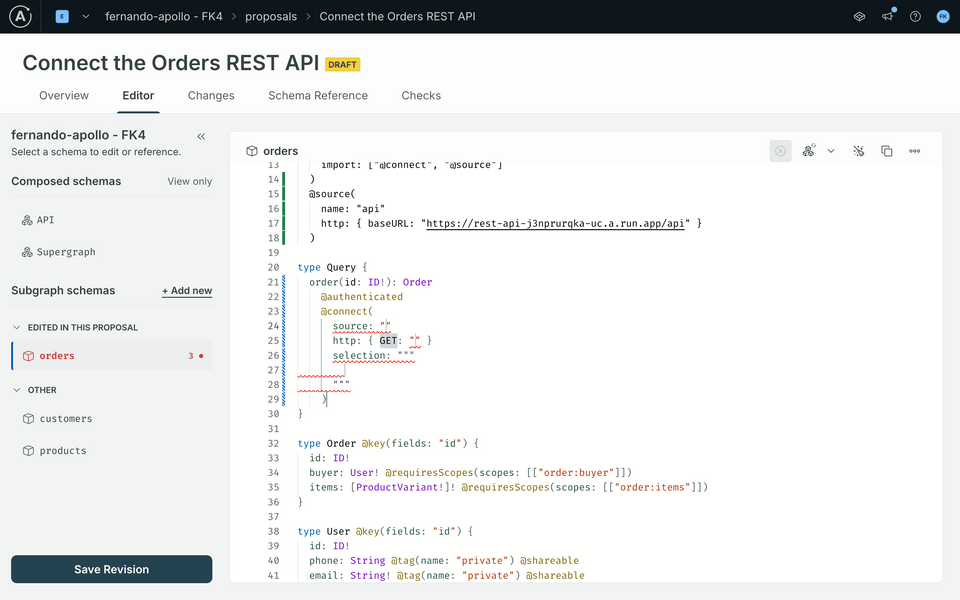
The editor will place the caret in the source: "" field. This is where you will define the connection between the schema and the source REST API. The source field should match the name field in the @source directive, which is "api" in this case. Go ahead and set the source to "api".
Hint: you can use ➡️ TAB to cycle between the various fields that need to be filled in the directive.
Next, we'll define what type of verb to use for our REST endpoint - in this case, it's a GET operation. Pressing TAB will take us to the next field, the relative path.
Let's take a look once again at the test URL: https://rest-api-j3nprurqka-uc.a.run.app/api/orders/1
- we have set the base URL to
https://rest-api-j3nprurqka-uc.a.run.app/apiin our@sourcedirective, therefore - the relative path for this operation is
/orders/1
After making these changes, our operation should look like this:
type Query {order(id: ID!): Order@authenticated@connect(source: "api"http: { GET: "/orders/{$args.id}" }selection: """""")}
6. Define the selection set
The selection field is where we map the fields returned by the REST API to our GraphQL schema. From our JSON response above, we know that the API returns id, customerId, and variantIds. In turn, our GraphQL schema defines that the Order type has three fields: id of type String, buyer of type User, and items of type ProductVariant.
Mapping the id field is quite straightforward since we have the exact same field. Let's start by adding the id field to our selection set. Add the id field directly into the selection field as shown below:
type Query {order(id: ID!): Order@authenticated@connect(source: "api"http: { GET: "/orders/{$args.id}" }selection: """id""")}
Note: immediately after adding the id field, the buyer and items fields will display red squiggly lines beneath them. This occurs because we have not yet defined these fields in the selection set:
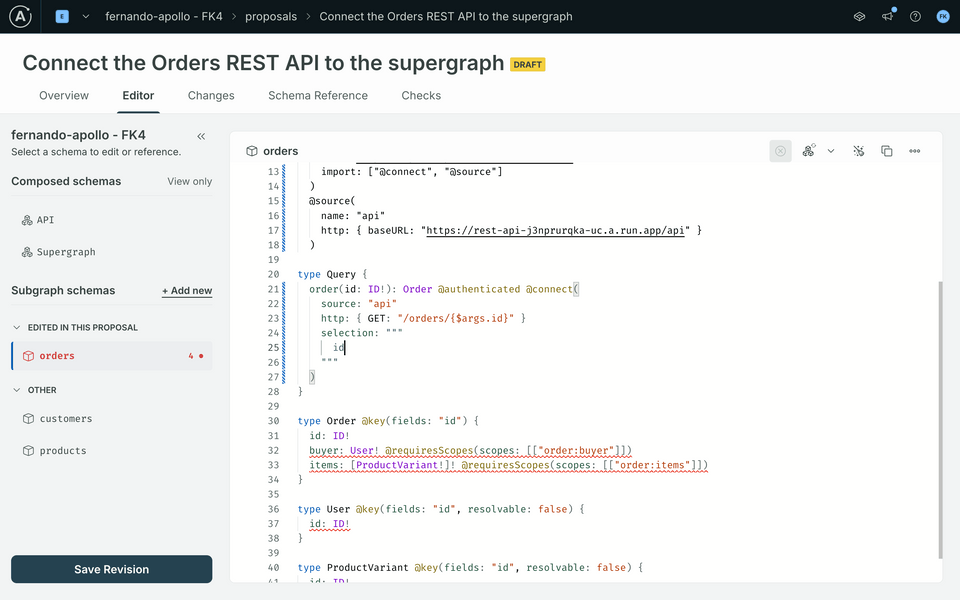
What about buyer and items then? In any REST scenario, this would involve making additional requests to the API to retrieve the User and ProductVariant details. However, thanks to Federation and the Apollo Router, all we need to do is return the IDs of both the User and ProductVariant, and the Apollo Router will handle the rest. It does that by using the @key directive on the Entity types to resolve the IDs to the actual objects using the other subgraphs in a supergraph.
From the above, for the Apollo Router to resolve an Entity using its ID we need to return a value of the form:
{ "id": "the-id-of-the-entity" }
For more information on Apollo Connectors and Federation, check the Reference entities section of the Apollo Connectors documentation.
Let's start by asking the Apollo Router to resolve the buyer. To do this, we need to add this line in the selection set:
type Query {order(id: ID!): Order@authenticated@connect(source: "api"http: { GET: "/orders/{$args.id}" }selection: """idbuyer: { id: $.customerId }""")}
Note: the $ is a special symbol used to hold the value enclosed by the parent {...} selection, or the root value at the top level. See the Variables section in the Apollo Connectors documentation for more details.
The { ... } syntax allows us to create a new object in the selection set. In this case, we are creating a new object with the id field set to the customerId field returned by the REST API.
Conversely, the items field is an array of ProductVariant entities. We can use the same syntax to create an array of objects in the selection set. The variantIds field returned by the REST API is an array of String values, so in this case we can use a special syntax that allows to map these values as an array of key-value pairs.
Let's map the items in our order to the JSON payload in the selection set:
type Query {order(id: ID!): Order@authenticated@connect(source: "api"http: { GET: "/orders/{$args.id}" }selection: """idbuyer: { id: customerId }items: $.variantIds { id: $ }""")}
The $.variantIds { ... } syntax allows us to iterate over the variantIds array and return an array of objects with the id field set to the value of each element in the array. See the Wrapping fields section for more details on this syntax.
Panic!!😱😱 Composition is still returning an error!
Yes indeed - we are still missing one crucial piece of information! In our schema design, the order(id: ID!) operation is designed also as an Entity resolver! Typically with a subgraph, you would create a special method to resolve this, in the form of __resolveReference. However, with Apollo Connectors, we can mark our operation as an entity resolver by adding the entity: true at the end of our @connect directive, like so:
type Query {order(id: ID!): Order@authenticated@connect(source: "api"http: { GET: "/orders/{$args.id}" }selection: """idbuyer: { id: $.customerId }items: $.variantIds { id: $ }"""entity: true)}
When entity: true is set on a connector, its field provides an entity resolver for query planning. Check the rules for entity: true in the Apollo Connectors documentation.
And that's it! 🎉🎉🎉 Check the composition status in your editor. If there are no errors, we should be ready to go:
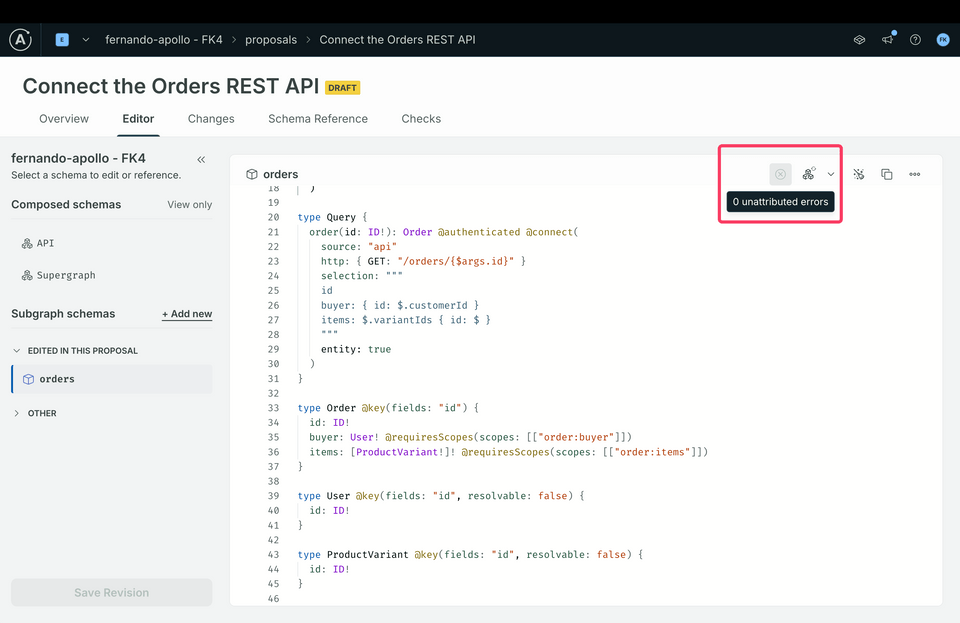
Now copy the contents of the Proposals editor and head to the Github page. Open the orders-schema.graphql file and paste the contents of the Proposals editor into the file. Once you have pasted the contents, commit the changes.
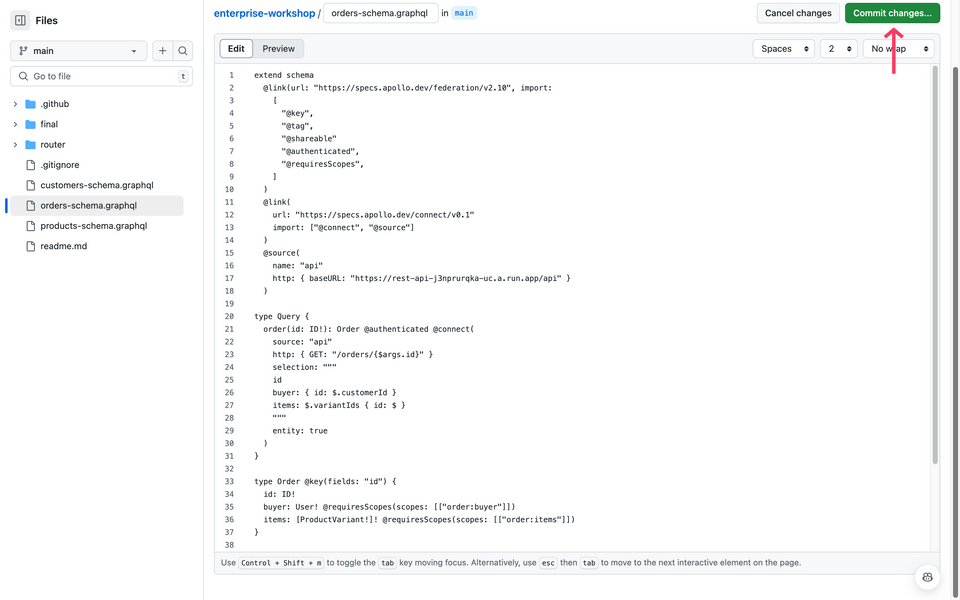
Once the file has been commmited, the changes will be automatically applied to the supergraph. You can check the status of the publish job in the Actions tab of the repository. If the workflow workflow has completed successfully, we can now head over to Apollo Studio to test our new schema.
Check your work: testing the new schema
Let's make a request to retrieve an order's buyer and items.
Create a new tab and copy the operation below:
query order($orderId: ID!) {order(id: $orderId) {idbuyer {emailfirstName}items {pricesizecolorwayid}}}In the Variables panel, copy and paste the following JSON payload:
{ "orderId": "1" }Add an the
Authorizationheader (if not present already) and set the value toBearer {{authorizedToken}}.
Bearer {{authorizedToken}}
Send the request - we should see that data has successfully been returned!
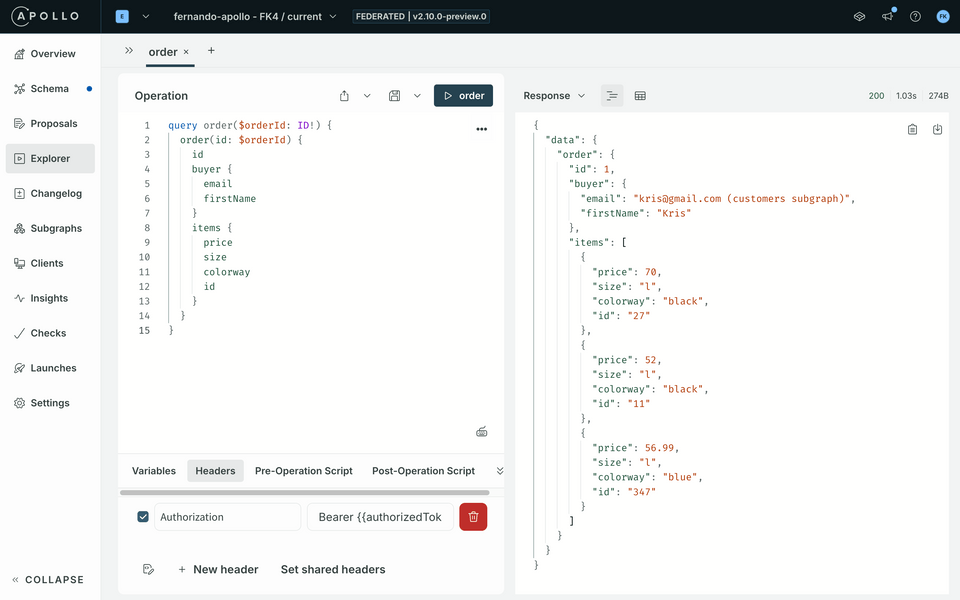
But wait, how do we actually know that the data is coming from the REST API and not the Order subgraph? 🤔
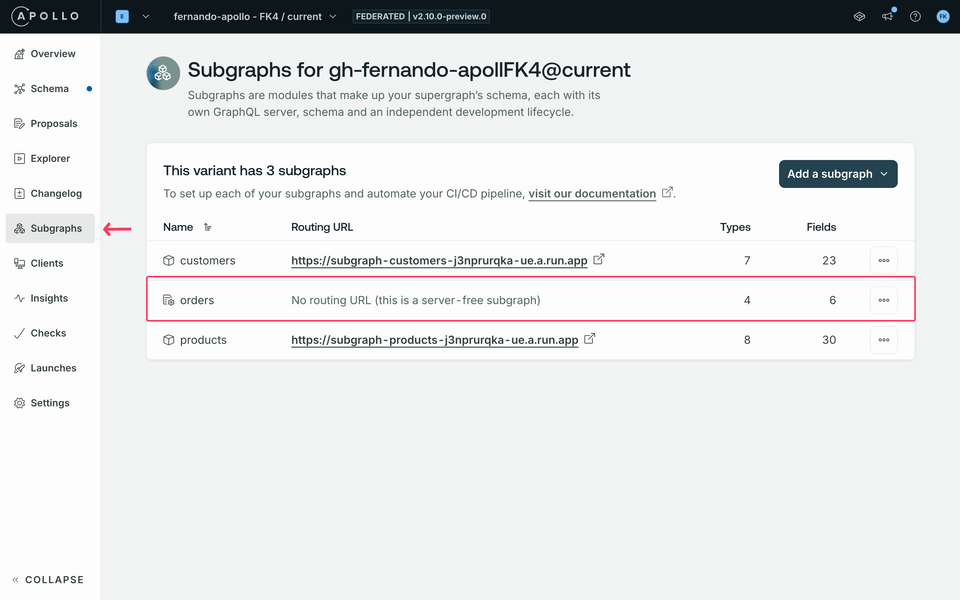
Head over to Subgraphs in Apollo Studio. You should see that the entry for Order is different: this is because we have used Apollo Connectors to connect the Order schema to the REST API directly:
Conclusion
🎉 Congratulations on completing this lab! 🎉 By using Apollo Connectors you have now created a server-free implementation of a GraphQL subgraph - still part of a Supergraph, saving resources by avoiding additional deployments and development time.
With Apollo Connectors,
- you no longer need a specific service and resolver code to integrate REST services into your graph. This simplifies integrating the many GraphQL APIs that are nothing more than passthrough services to REST APIs.
- you can leverage the power of Apollo Federation to efficiently orchestrate calls to multiple services and compose the results into a single response.
- you can define your REST integration in your schema and let the GraphOS Router handle the rest.
Workshop conclusion
Congratulations on successfully completing this workshop! 🎉🎉🎉
Throughout this journey, we have now added:
- subscriptions,
- authentication and authorization,
- a coprocessor,
- operation limits,
- persisted queries,
- safelisting, and
- Apollo Connectors!
We did all of this with either schema changes or yaml configuration. With those simple changes, we were able to create a graph that serves more use cases and does so in a more secure way.
Beyond that, we have also begun the process of detailing how we can manage schema changes for a supergraph across multiple stakeholders to ensure our graph remains highly available.
KBT Threads can now confidently deploy their supergraph to support their new omni-channel presence!
